Making the most of what you find

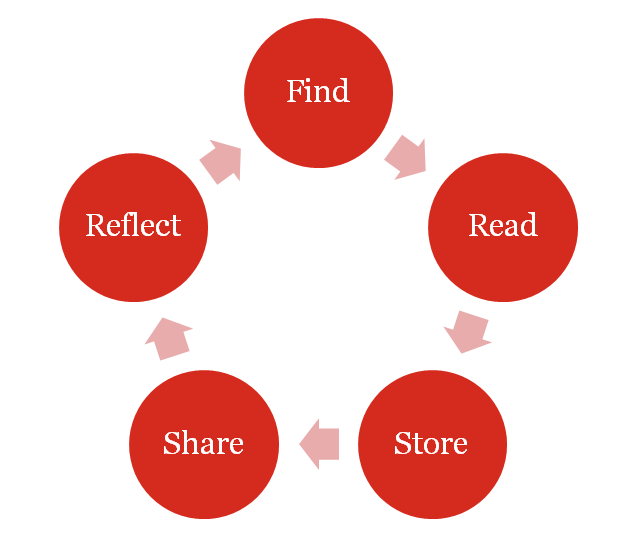
So far in our workflow series we’ve looked at ways to stay organised and keep track of valuable resources we find online. We’ve managed to triage our reading, made sure we have somewhere to store important resources forever and whipped our bookmarks into order. In this final post of our workflow series, we’re going to look at the last stage of our workflow process, reflection.

Reflect

The act of filtering information, saving for later and sharing within our network are important steps in organising ourselves and helping others. But for all of these tasks to be really valuable it’s important to now use what you have read and collected to reflect on the thoughts of others and share your own ideas.

Just as a teacher wouldn’t accept a list of links from a student as an assignment, actively reflecting on what we collect helps crystallise our thoughts and contextualises the resources you share. Whether you are giving a speech about a topic, writing course materials or putting up a post on your blog, reflecting and sharing adds value for you and others.

One of the best ways to reflect on what you find is in a blog post. Blogs are a flexible and relatively easy way of publishing online, and the advantage of a blog for reflection is that it allows you to hyperlink to any online resources. In that way your blog not only becomes a way for you to collect and curate links, but also a way for you to tie them together and add your own reflections as well.

How to get started with blogging

  • Choose a blogging platform. Victorian educators (in State and Catholic schools) can get a free blog through Global2 -this is the platform that Bright Ideas uses. For all other educators Edublogs is a great option, and the wonderful team at Edublogs provide great technical support and are on hand to help you.  Of course, you could use other blogging alternatives like WordPress, Tumblr & Blogger. But if you’re looking to create a professional blog or are planning on blogging with students as well then then Edublogs and Global2 are the best options, as they handle comment moderation really well.
  • Have a look at the fabulous resources at the Edublogs Kick start your blogging page to learn about posting on your blog, adding pages and adding media or links to posts
  • Include an About Me page describing who you are and your interests. It will help you connect with other educators.
  • Aim to regularly post on your blog. It’s a great record of professional reading and learning, so get in the habit of reflecting on your blog and including links to the resources you’ve accessed. Remember that you must own anything that you post on your site, so don’t upload copyrighted material. But linking is great!
  • When you make a new post, be sure to share it on social media or via social bookmarking. You might think no one wants to read your posts, but sharing is important and we’re sure that people will be interested in what you have to say.
  • Keep an eye on comments that appear on your blog. You will have to moderate them- this means you can approve them before they appear on your blog, or delete them if they are inappropriate.
  • Follow other interesting blogs using an RSS reader. This brings all of your followed blogs together in one place and makes it easy to see new posts. It will also be the way that other people can follow your blog. Feedly is a very nice RSS reader that works in all browsers and includes some great mobile apps. It also integrates really well with tools like Pocket, Evernote, Twitter and Diigo.


An extra step- tying everything together

So now you’re set up with some great tools that will help you through the five stages of workflow. You have places to organise your reading, collect and share links, store resources, and reflect on what you’ve found. Most of the tools that we have explored tend to integrate well with each other, so for example you can send an interesting article directly from Feedly to Pocket. Once you’ve read that article in Pocket you could tweet about it or bookmark it in Diigo. Or you could save it to your Evernote account.

Sometimes these options aren’t available, so you may need to explore an automation tool like If This Then That. This service lets you connect up your online accounts and then create recipes that will automate tasks. As an example, you could tell If This Then That to make a new bookmark in Diigo whenever you archive an item in Pocket. Or you could set it up so that whenever you publish a new post on your blog, that post is also saved into your Evernote account.

If This Then That lets you create recipes that will automate actions between two accounts. This recipe creates a bookmark in Diigo from your Pocket account.

It’s a bit hard to explain, and the best way to learn how it all works is to get in and have a bit of a play. But here’s a guide to setting up an If This Then That recipe.

So that brings us to the end of the worflow series, and hopefully it’s helped you think about how best to stay organised online. The tools we’ve explored are just some of the options available andthere are lots of other fabulous tools that are available online that help you gather, present, share and reflect on what is on the web. Whatever services you decide to use, remember to have a clearly defined set of rules that will help you put that resource in the right spot. Then you’ll be well on your way to feeling just that little bit more organised.

Image credit: J. W. Lindt (1880) New Wallan deep lead gold mine, Vict., State Library of Victoria


Tame those bookmarks

So far in our digital workflow series we’ve looked at ways to triage information for later reading, and also how to save interesting articles or resources to our own digital library. Using a short term tool like Pocket along with a long term storage tool like Evernote makes for a powerful combination, but we also need to consider how best to share with other people. It’s here that we look at the next step of the workflow process- share.

Share

Sharing our own work or promoting resources created by others is an important aspect of being a valuable member of our network. Think about all of the great resources you’ve found online, and how you found them. These resources were created and shared by someone. They were then promoted by others, either on social media, through bookmarking sites or by linking in blog posts. Everyone involved in that process has played some part in bringing that great resource to your attention, so by adding our own thoughts or recommendations then we pass that resource on to others.

One great way to do this is through a social bookmarking tool. These tools let you bookmark great resources to build your own library of links, and they also let you share with others. They are a much better alternative to the old workflow of bookmarking that might work something like this:

  • find a great site
  • bookmark it in your browser
  • email it to yourself
  • email it to your colleagues

But this process has some problems:

  •  your browser bookmarks will probably quickly become unmanageable
  •  you will email it to yourself, not have time to look at the link and then put it in a folder marked Later or Stuff (which you’ll never check)
  • your colleagues will be busy, and drag it to their own folder marked Later or Stuff (which they’ll never check). Then you’ll eventually decide that you don’t want to bog them down with emails
  • you and your colleagues miss out on those great resources

So instead of that process, let’s find a better way to save those bookmarks, and put them in a place where anyone can find them when they need them. To do this you can use a social bookmarking tool, and one of the best around is Diigo.

Here’s a brief introductory video showing how Diigo works.

How to get started with Diigo

  • To get started with Diigo, visit diigo.com and sign up for an account.  There is also an option for an upgrade to free educator accounts if you sign up with an email address from a registered educational domain (such as Edumail)
  • The one problem with Diigo is that adding your first bookmark is quite a complicated process, and until you get your first bookmark added the library page is a bit bare. So we’ve put together a complete guide to getting started with Diigo, including installing a toolbar in your browser, organising your library and much more.
  • Once you’ve added a few bookmarks to your library, explore the annotation, highlighting and sticky note features of Diigo.
  • Now that you are building your own library, why not search for groups of educators with interests in your subject area? One great group to join is VicPLN, which includes a wide range of general teaching and learning resources. Click this link, request to join (select Join this group)and when you’re approved you’ll be able to share your favourite resources with the group. You can also comment on links and save any links you love into your own library by selecting More>Save.

    You can comment on the links of people in your group, and also save their links to your personal library

  • Now that you’ve seen how Groups work, form your own group within your school. Instead of emailing interesting links to colleagues make sure that you all share them into the group, so they are there when anyone needs them. Use tags to organise your resources into subject, year level or topic. You could also create groups within your classes and have students post interesting links as they complete their research (make sure you get an educator account to do this).
  • Now that you’ve worked out a place to store your new bookmarks, think about what you want to do with those bookmarks you’ve accumulated over the years. If they are all stored in your browser then you might think about exporting them all to a file and them importing them into Diigo. Look for the export option in your browser’s bookmark manager, and when you’ve exported all the bookmarks to a file visit Diigo Tools. Choose Import, select the file and import them into your library. Or, you might like to declare ‘bookmark bankruptcy’, get rid of all of your old bookmarks and just start again from scratch. It’s a big step, but might be worth it!
  • If you are using the mobile version of Pocket, look for the Diigo option in the sharing menu. Hook up your Diigo account to make saving great articles from Pocket direct to Diigo.

    Pocket’s mobile app includes an option for saving your articles to Diigo

  • Lastly, now that you’ve organised your bookmarks into Diigo, think about what bookmarks you still need in your browser. These should only be pages that you visit regularly, and ones that you need for quick access. Try to keep your browser bookmarks down to your most used websites (email, banking, newspaper, RSS reader, social network, Evernote, Diigo etc) and put anything less important into Diigo, where it’s safe but not in the way.

    Get your browser bookmarks in order and only save your most visited sites in your browser

The only thing to consider now is what you want to save to Diigo, compared to what you want to save into Evernote. Diigo doesn’t store pages forever (unless you pay for a premium account), so basically if you want to make sure you’ll always have access to the contents of an article, clip it into Evernote. If the page is that valuable then you probably want to save the bookmark and share it to your Diigo followers or groups as well. If you are not sure whether you’ll need the page in the future, but want to have that option, then that’s the perfect page to bookmark just in Diigo.

Diigo (or other social bookmarking tools like Delicious or Kippt) are the perfect option for saving your own bookmarks and also for sharing interesting resources without feeling like you are pushing them on other people. Using Pocket, Evernote and Diigo and having a clear idea about the role of each tool means you will always be able to find that resource that you need, when you need it.

Of course, there are a number of other ways to share the resources you find, such as on social media, through curation tools or even in person. In the final post of this series we will look at other ways to share, how to streamline your workflow by joining these tools together and also how to reflect more deeply on resources you’ve found.


Collate resources into lessons with MentorMob

The internet is an incredibly deep learning resource and it seems that you can find tutorials, readings and guides for just about any topic. MentorMob aims to help you organise all of these resources from the web into structured lessons.


MentorMob lets you organise web sites, pictures and videos into a playlist to create a lesson. Students can view the resources in the designated order and skip back and forth between each resource.

An example of a MentorMob lesson

The playlist displays in your browser (see this example lesson about using MentorMob). The lesson can also be embedded in your blog as we’ve done below.

While MentorMob seems to serve a similar purpose to Diigo’sPlay as web slides‘ feature (available in the lists view) it does look like a promising site for collating resources into a structured lesson. Being able to embed playlists also makes for a neat, self contained resource. We’ll be interested to see the quality of publically available lessons put together by MentorMob’s users.

Diigo user guide now available

We’ve now posted a user guide to help you get started with the bookmarking tool Diigo. This brilliant service allows you to save, tag and search your own bookmarks. Diigo also lets you create public lists of links and share your bookmarks with other people in groups, such as the #VicPLN Diigo group. Diigo is the perfect way to share bookmarks within your faculty, your class or your learning network.

You can find the guide to getting started with Diigo under the Guides menu, or visit it directly here. The video tutorials are also available as a YouTube playlist which you can watch below. Remember to subscribe to Bright Ideas on YouTube to stay up to date with all of our new videos.

Taking Diigo beyond the bookmark

For anyone who hasn’t yet used Diigo, or anyone who uses it purely as bookmarking links for students may find the information on ‘Taking Diigo beyond the bookmark”  from Keith Crawford useful. Keith is a blogger who says

My site is part of my mission to help people and organizations understand how to use technology to accomplish their mission. I’ve been helping organizations implement technology for 10 years as a Network Engineer and I’ve been blogging for the past 5.  My desire is to help individuals and organizations realize the transformative power of technology.

His post on Taking Diigo beyond the boomark is an excellent one. With examples of both educational (such as creating reading lists for teachers and or students) and personal uses (DIY recipe collection), this post really makes you think about how the power of Diigo can be applied to many situations.

diigocheck

Worth a look, a think and a discussion with colleagues to see how you can take Diigo beyond the bookmark. You can access the Bright Ideas Diigo bookmarks here.

View Docs Online

View Docs Online certainly is a quick and simple alternative to GoogleDocs.

View Docs Online homepage

Simply browse your computer for the document you want to upload, click ‘View Docs Online’ and voila, your document is ready to be embedded into blogs, shared via email, Twitter, Delicious, Diigo, LinkedIn, Tumblr (and many more) or even exported as a PDF. Here is a video to show you more about View Docs Online:

Furl becomes part of Diigo

The following information comes from Furl, a Web 2.0 resource that was reviewed  by Bright Ideas in 2008.

Dear Furl Users,

The Furl team is very pleased to announce that Furl has become part of Diigo.com. We worked hard to find Furl a home where loyal users like you could continue to benefit from best-of-breed social bookmarking and annotation tools. Hands down, Diigo.com was the winner due to its innovative approach to online research tools and knowledge sharing.

The Diigo team is dedicated to making sure you continue to get top notch features and service. They’ve got a crack team of technologists who love making research and knowledge sharing as easy and efficient as possible. Exporting your data from Furl to Diigo is super easy.

Just follow this link: http://cp20.com/Tracking/t.c?5g68-3P77-Ama792

We feel fortunate to have been able to serve as your social bookmarking site provider and can’t thank you enough for your loyal support over the past four years. We’ll miss you and we wish you the best as part of the Diigo community.

Zotero

A new way to research? Zotero is a revolutionary Mozilla Firefox  (an alternative web browser to Internet Explorer) extension that helps users ‘collect, manage and cite’ research sources.

With the results of a recent survey where 49% of Cambridge students admitted plagiarism, that sounds fantastic. How  does it work?

The Zotero website says that it:

  • ‘automatically captures citation of information from web pages
  • has a playlist like library that keeps a record of saved searches
  • saves records and notes in many languages
  • integrates with Microsoft Office, WordPress and other blogging software
  • has formatted citation export
  • stores web pages, PDFs, files, images, links and other attachments.’

Like Diigo, you can create ‘sticky note’ annotations that ‘stick’ onto the webpage you are using. The Zotero website explains how to create bibliographies; ‘For example, you can drag and drop references into any text field as either HTMLor plain text. You can also print bibliographies directly from Zotero or copy them to your clipboard. In addition, MS Word and OpenOffice plugins offer more precise control for integrating bibliographic information in your writing projects.’

Zotero provides a lot of information about how to use it as a research tool. There are screencasts that give demonstrations of how to use Zotero, as well as lots of links that explain just about everything you’ll need to know. Once downloaded, the Zotero icon lives in the bottom right-hand corner of the Firefox window. Just click on the Zotero icon when you want to use it. With the click of the mouse, Zotero saves the bibliographic information of a website to file.

Zotero in action

Zotero in action

Zotero can also be used with Netscape Navigator (no link as Netscape are no longer developing their product) and Flock web browsers as well as Firefox. Zotero 1.0 is the current version, but when version 2.0 is released, it will allows users to share collections, notes and documents, allowing better collaboration. Although Zotero is downloaded to a particular computer rather than generating a user login, it can be used on multiple computers. Version 2 should enable user logins for better portability.

Zotero really is an amazing tool for those who want to organise their research, searches or topics. It could be the new way to take notes and to teach students how to notetake online! Also a wonderful tool for anyone doing graduate or post graduate studies.

Diigo

Diigo (pronounced Deego) is a Web 2.0 tool that lets users bookmark, highlight  and add sticky notes to web pages. You can add and share (or not share if you don’t want to) annotations and get recommendations from other users. You are able to publish easily from Diigo to your blog or email and all references will automatically appear. That’s a huge bonus in this day of plagiarism. Diigo even call their tools ‘the best companion for online research’ and that’s a big call. Is it warranted?

Diigo

Diigo

The Diigo blog states ‘We are happy to announce the release of Diigo Educator Accounts, a suite of features that makes it incredibly easy for teachers to get their entire class of students or their peers started on collaborative research using Diigo’s powerful web annotation and social bookmarking technology.’ You do have to apply to Diigo for an educator account upgrade and it can take up to 48 hours for them to process your application (you have to fill out how/why you want to use Diigo in your school).

Diigo has to be downloaded to your toolbar, but it is a very quick process. Diigo says, ‘Once approved for a Diigo Educator Account:

  • A teacher can create student accounts for an entire class with just a few clicks (and student email addresses are optional for account creation)
  • Students of the same class are automatically set up as a Diigo group so they can start using all the benefits that a Diigo group provides, such as group bookmarks and annotations, and group forums.
  • To protect the privacy of students, student accounts have special settings which only allow their teachers and classmates to contact them and access their personal profile information.
  • Ads presented to student account users are limited to education-related sponsors.’

Sounds like it’s worth a look and a trial with a class. Anything that helps students research and acknowledge sources is worth pursuing. Have a look at the video that explains how Diigo works: How to use Diigo. And thanks to John Pearce of Salty Solutions for this guide to Diigo.