Mining the treasures of Trove

It’s sometimes easy to forget how lucky we are to have so many digitised items freely available online. Institutions from around the world are making their collections open to people who could never have previously accessed these items. When this is combined with user uploaded content that is being added to sites like Flickr, the amount of digital content can almost become overwhelming.

Given this, it’s no surprise that educators see the importance of developing strong search skills in students. We’ve often written about choosing the right search term, filtering results and honing in on what we want. That’s great, but there are also some interesting ways to discover new items, or even items that we didn’t know existed. Here we’re going to take a quick look at three tools that tap into the incredible range of collections in the National Library of Australia’s Trove site. If you’re not familiar with Trove, prepare to spend the rest of your day there! It’s a unified search of items from many libraries across Australia, including books, newspapers, manuscripts, pictures and more.

Trove has a pretty familiar (yet very powerful) search feature. Make sure you go there and have a play. But for now, let’s look at three other tools that harness the amazingly open nature of the site. All of these tools are still quite experimental, so you may see some bugs or glitches, but they are well worth an explore.

The first of these is Trove Mosaic, built by Mitchell Whitelaw. This site lets you enter a search term and then displays a mosaic of images, which can be sorted by collections, titles or decade. Clicking on an item will take you to the record on the respective library’s website. It’s a brilliant way to explore the amazing digitised pictures available from across Australia.

Trove Mosaic displays images in a lovely sortable mosaic. Here we’ve sorted our search for ‘rabbits’ by decade.

The second tool for exploration of Trove is QueryPic  This tool  searches for terms within Trove’s digitised historical newspapers collection, and displays a graph showing the number of results for that term per year. You can add multiple terms and searches to a graph. In this way you can see the patterns of usage of a particular term over time. Clicking on a particular year in the graph will show you the related articles, and this then leads you directly to each digitised article.

QueryPic works on a similar principle to Google’s Ngram viewer, which searches and displays the usage of phrases in digitised books over time. Of course, it is important to remember that not every newspaper from the time has been digitised, but it’s definitely an interesting tool for analysing the frequency of phrases, like in our example below where use of the term ‘bushrangers’ peaks in the mid 19th century,  whilst use of the term ‘theft’ steadily rises.

Our search for theft (in red) and bushrangers (in blue) shows some interesting trends

The final site is a brand new tool built by the One Week, One Tool team. This team of coders are aiming to build a new tool each week, and one of their first projects is a seredipity site called Serenidip-o-matic. Paste in some text (such as a bibliography, essay, blurb) and then see what is returned based on keywords from your passage. The site searches sources like Flickr, Europeana & the Digital Public Library of America. It now also includes Trove (thanks to the work of Tim Sherratt at NLA). As you’d expect from a serendipity machine, results aren’t always completely relevant, but they are certainly interesting.

All of these sites show the possibilities presented by digital collections when they are built with open architecture. Trove’s open API means that tools can harvest the collection and present items in very different ways. We’re lucky to not only have such amazing collections, but also people who want to work with them to build these wonderful tools.


Making the most of what you find

So far in our workflow series we’ve looked at ways to stay organised and keep track of valuable resources we find online. We’ve managed to triage our reading, made sure we have somewhere to store important resources forever and whipped our bookmarks into order. In this final post of our workflow series, we’re going to look at the last stage of our workflow process, reflection.

Reflect

The act of filtering information, saving for later and sharing within our network are important steps in organising ourselves and helping others. But for all of these tasks to be really valuable it’s important to now use what you have read and collected to reflect on the thoughts of others and share your own ideas.

Just as a teacher wouldn’t accept a list of links from a student as an assignment, actively reflecting on what we collect helps crystallise our thoughts and contextualises the resources you share. Whether you are giving a speech about a topic, writing course materials or putting up a post on your blog, reflecting and sharing adds value for you and others.

One of the best ways to reflect on what you find is in a blog post. Blogs are a flexible and relatively easy way of publishing online, and the advantage of a blog for reflection is that it allows you to hyperlink to any online resources. In that way your blog not only becomes a way for you to collect and curate links, but also a way for you to tie them together and add your own reflections as well.

How to get started with blogging

  • Choose a blogging platform. Victorian educators (in State and Catholic schools) can get a free blog through Global2 -this is the platform that Bright Ideas uses. For all other educators Edublogs is a great option, and the wonderful team at Edublogs provide great technical support and are on hand to help you.  Of course, you could use other blogging alternatives like WordPress, Tumblr & Blogger. But if you’re looking to create a professional blog or are planning on blogging with students as well then then Edublogs and Global2 are the best options, as they handle comment moderation really well.
  • Have a look at the fabulous resources at the Edublogs Kick start your blogging page to learn about posting on your blog, adding pages and adding media or links to posts
  • Include an About Me page describing who you are and your interests. It will help you connect with other educators.
  • Aim to regularly post on your blog. It’s a great record of professional reading and learning, so get in the habit of reflecting on your blog and including links to the resources you’ve accessed. Remember that you must own anything that you post on your site, so don’t upload copyrighted material. But linking is great!
  • When you make a new post, be sure to share it on social media or via social bookmarking. You might think no one wants to read your posts, but sharing is important and we’re sure that people will be interested in what you have to say.
  • Keep an eye on comments that appear on your blog. You will have to moderate them- this means you can approve them before they appear on your blog, or delete them if they are inappropriate.
  • Follow other interesting blogs using an RSS reader. This brings all of your followed blogs together in one place and makes it easy to see new posts. It will also be the way that other people can follow your blog. Feedly is a very nice RSS reader that works in all browsers and includes some great mobile apps. It also integrates really well with tools like Pocket, Evernote, Twitter and Diigo.


An extra step- tying everything together

So now you’re set up with some great tools that will help you through the five stages of workflow. You have places to organise your reading, collect and share links, store resources, and reflect on what you’ve found. Most of the tools that we have explored tend to integrate well with each other, so for example you can send an interesting article directly from Feedly to Pocket. Once you’ve read that article in Pocket you could tweet about it or bookmark it in Diigo. Or you could save it to your Evernote account.

Sometimes these options aren’t available, so you may need to explore an automation tool like If This Then That. This service lets you connect up your online accounts and then create recipes that will automate tasks. As an example, you could tell If This Then That to make a new bookmark in Diigo whenever you archive an item in Pocket. Or you could set it up so that whenever you publish a new post on your blog, that post is also saved into your Evernote account.

If This Then That lets you create recipes that will automate actions between two accounts. This recipe creates a bookmark in Diigo from your Pocket account.

It’s a bit hard to explain, and the best way to learn how it all works is to get in and have a bit of a play. But here’s a guide to setting up an If This Then That recipe.

So that brings us to the end of the worflow series, and hopefully it’s helped you think about how best to stay organised online. The tools we’ve explored are just some of the options available andthere are lots of other fabulous tools that are available online that help you gather, present, share and reflect on what is on the web. Whatever services you decide to use, remember to have a clearly defined set of rules that will help you put that resource in the right spot. Then you’ll be well on your way to feeling just that little bit more organised.

Image credit: J. W. Lindt (1880) New Wallan deep lead gold mine, Vict., State Library of Victoria


Tame those bookmarks

So far in our digital workflow series we’ve looked at ways to triage information for later reading, and also how to save interesting articles or resources to our own digital library. Using a short term tool like Pocket along with a long term storage tool like Evernote makes for a powerful combination, but we also need to consider how best to share with other people. It’s here that we look at the next step of the workflow process- share.

Share

Sharing our own work or promoting resources created by others is an important aspect of being a valuable member of our network. Think about all of the great resources you’ve found online, and how you found them. These resources were created and shared by someone. They were then promoted by others, either on social media, through bookmarking sites or by linking in blog posts. Everyone involved in that process has played some part in bringing that great resource to your attention, so by adding our own thoughts or recommendations then we pass that resource on to others.

One great way to do this is through a social bookmarking tool. These tools let you bookmark great resources to build your own library of links, and they also let you share with others. They are a much better alternative to the old workflow of bookmarking that might work something like this:

  • find a great site
  • bookmark it in your browser
  • email it to yourself
  • email it to your colleagues

But this process has some problems:

  •  your browser bookmarks will probably quickly become unmanageable
  •  you will email it to yourself, not have time to look at the link and then put it in a folder marked Later or Stuff (which you’ll never check)
  • your colleagues will be busy, and drag it to their own folder marked Later or Stuff (which they’ll never check). Then you’ll eventually decide that you don’t want to bog them down with emails
  • you and your colleagues miss out on those great resources

So instead of that process, let’s find a better way to save those bookmarks, and put them in a place where anyone can find them when they need them. To do this you can use a social bookmarking tool, and one of the best around is Diigo.

Here’s a brief introductory video showing how Diigo works.

How to get started with Diigo

  • To get started with Diigo, visit diigo.com and sign up for an account.  There is also an option for an upgrade to free educator accounts if you sign up with an email address from a registered educational domain (such as Edumail)
  • The one problem with Diigo is that adding your first bookmark is quite a complicated process, and until you get your first bookmark added the library page is a bit bare. So we’ve put together a complete guide to getting started with Diigo, including installing a toolbar in your browser, organising your library and much more.
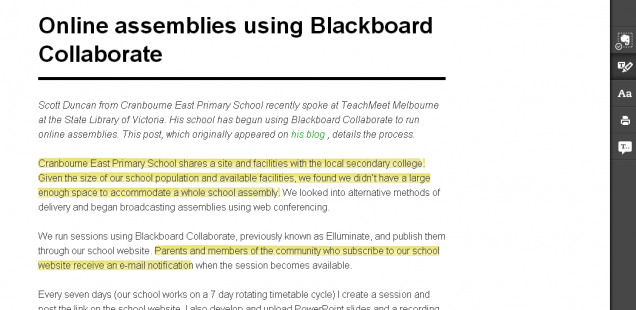
  • Once you’ve added a few bookmarks to your library, explore the annotation, highlighting and sticky note features of Diigo.
  • Now that you are building your own library, why not search for groups of educators with interests in your subject area? One great group to join is VicPLN, which includes a wide range of general teaching and learning resources. Click this link, request to join (select Join this group)and when you’re approved you’ll be able to share your favourite resources with the group. You can also comment on links and save any links you love into your own library by selecting More>Save.

    You can comment on the links of people in your group, and also save their links to your personal library

  • Now that you’ve seen how Groups work, form your own group within your school. Instead of emailing interesting links to colleagues make sure that you all share them into the group, so they are there when anyone needs them. Use tags to organise your resources into subject, year level or topic. You could also create groups within your classes and have students post interesting links as they complete their research (make sure you get an educator account to do this).
  • Now that you’ve worked out a place to store your new bookmarks, think about what you want to do with those bookmarks you’ve accumulated over the years. If they are all stored in your browser then you might think about exporting them all to a file and them importing them into Diigo. Look for the export option in your browser’s bookmark manager, and when you’ve exported all the bookmarks to a file visit Diigo Tools. Choose Import, select the file and import them into your library. Or, you might like to declare ‘bookmark bankruptcy’, get rid of all of your old bookmarks and just start again from scratch. It’s a big step, but might be worth it!
  • If you are using the mobile version of Pocket, look for the Diigo option in the sharing menu. Hook up your Diigo account to make saving great articles from Pocket direct to Diigo.

    Pocket’s mobile app includes an option for saving your articles to Diigo

  • Lastly, now that you’ve organised your bookmarks into Diigo, think about what bookmarks you still need in your browser. These should only be pages that you visit regularly, and ones that you need for quick access. Try to keep your browser bookmarks down to your most used websites (email, banking, newspaper, RSS reader, social network, Evernote, Diigo etc) and put anything less important into Diigo, where it’s safe but not in the way.

    Get your browser bookmarks in order and only save your most visited sites in your browser

The only thing to consider now is what you want to save to Diigo, compared to what you want to save into Evernote. Diigo doesn’t store pages forever (unless you pay for a premium account), so basically if you want to make sure you’ll always have access to the contents of an article, clip it into Evernote. If the page is that valuable then you probably want to save the bookmark and share it to your Diigo followers or groups as well. If you are not sure whether you’ll need the page in the future, but want to have that option, then that’s the perfect page to bookmark just in Diigo.

Diigo (or other social bookmarking tools like Delicious or Kippt) are the perfect option for saving your own bookmarks and also for sharing interesting resources without feeling like you are pushing them on other people. Using Pocket, Evernote and Diigo and having a clear idea about the role of each tool means you will always be able to find that resource that you need, when you need it.

Of course, there are a number of other ways to share the resources you find, such as on social media, through curation tools or even in person. In the final post of this series we will look at other ways to share, how to streamline your workflow by joining these tools together and also how to reflect more deeply on resources you’ve found.


Workflow and the digital spare room

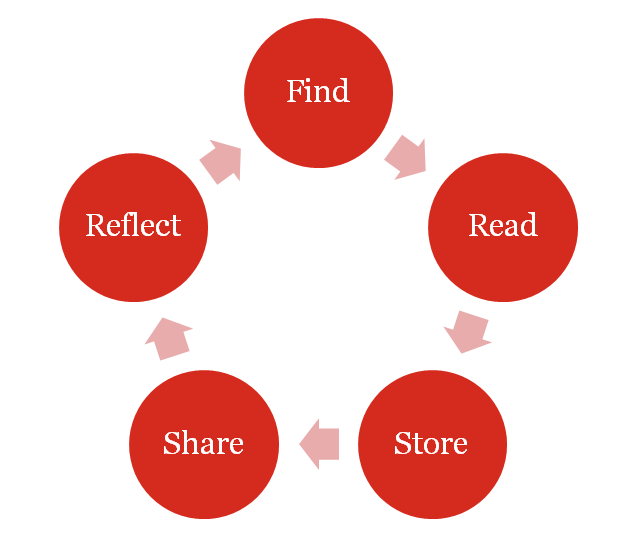
Your information workflow is a set of rules that govern how you find, read, store, share and reflect on information. In the first post of this series we explored the first two steps of this process and how you can make use of a read later service like Pocket to organise your reading for more convenient times. One you’ve done that reading, you need to move to the next step in the process, which is deciding whether you’d like to save the content so you’ll always have access to it.

Store

It may seem strange that in a time where information is so easily accessible online that we would want to save a copy of that information for ourselves. You might think that it’s easier just to bookmark the page and visit it whenever you need. But that ignores the dynamic nature of the internet. An article might be edited, the url of the page could change or the page or entire site could even be taken down. So in those cases it is best to save your own copy of the page for later reference.

This doesn’t necessarily mean that you should save every page that you come across. There are a number of tools that make it so easy to save articles that you could fall into the trap of having too much information in your ‘digital spare room’. It can mean that you end up being overwhelmed by the amount of pages you’ve saved. So once you’ve read that article, consider this question:

Is this something that I will want to revisit regularly and is it critical to my work or interests?

If the answer is yes, then save it to your account. If you are unsure, then our advice would be to bookmark the page instead (we’ll talk about bookmarks in the next post in this series). If the answer is a resounding ‘No’ then get rid of it completely.

Why don’t we want to just save everything we read? Think of it this way. When you save pages, you are building your own library. That library is fully searchable, but the more you put in there, the more cluttered your search results will become. You’ll soon find that you’ll need to organise your resources into categories, or cull parts of your personal library to make it easier to find what you need. Pretty soon that tool that was supposed to make your life easier becomes just another chore that needs to be completed. If you’ve ever cleaned out your spare room or filing cabinet and wondered “Why did I save this to start with?” then you’ll know what we mean.

So once you’ve read that article online or in Pocket, make the decision about whether you want to save your own copy. If you do, then Evernote is the place to do it.

We’ve written about Evernote many times and even though there are competitors that do similar things (such as OneNote and Springpad) we still find Evernote to be the best way to store and sort information. Your library will synchronise across all of your devices (including mobile) and it’s a great way to manage your own notes, audio and pictures. But Evernote becomes even more valuable when you make use of the Evernote web clipper tool. This extension sits in your browser and lets you save the contents of any web page (except for video) to your Evernote account. That way even if the page is changed, you’ll always have the original version.

Here’s a video showing you how the web clipper works in your browser.

How to get started with Evernote:

  • Sign up for an account at evernote.com Free accounts are limited to 60mb of uploads a month (which is plenty for most people).
  • Install the Evernote web clipper by visiting this page and selecting Get Web Clipper (if you use Internet Explorer then you’ll need to install the full version of Evernote on your computer- this will then install the Evernote web clipper in your browser).
  • Install the desktop version of Evernote for Mac or PC here.
  • Install the Evernote Clearly extension in your browser. This extension provides a cleaner reading experience and also lets you highlight text with different colours before saving to your account.

    Evernote Clearly removes any extra detail on the page and lets you focus on the article. You can highlight text and then save to your account.

  • Evernote has a range of mobile apps for most popular mobile phones and tablets. Find them by searching your app store. There are also a number of other official Evernote apps that you can use, such as Skitch (a screenshot annotation tool) and Evernote Hello (which manages contacts and business cards). This page include links to all official Evernote downloads and products.
  • We’ve created a comprehensive guide to getting started with Evernote, including how to create new notes, organise your library and share notes or notebooks online. There are also a number of guides on the Evernote site for using the different versions of Evernote
  • You can also make life easier by locating your unique Evernote email address and sending any interesting articles there. This will create a new note in your library is a much more efficient way then emailing yourself. Find out how here.
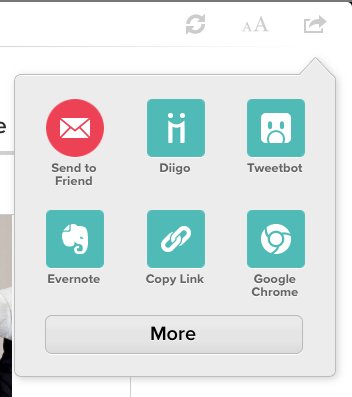
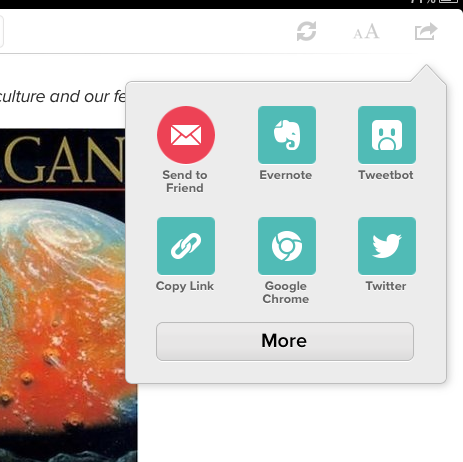
  • If you already use the mobile version of Pocket then make sure you connect your Evernote account into the Pocket app. This is one of the easiest ways to save articles to Evernote from mobile devices. In Pocket, look for Evernote icon under the share menu (see the iPad version below). If you can’t see the Evernote icon select More. Login with you Evernote details, and when you want to save an article you can do it with one click. (see the iPad screen grab below for an example).

Saving to Evernote on a mobile device can be difficult, but fortunately Pocket includes the option to connect your Evernote account

So that’s how Evernote can be used in the Store phase of your workflow. The power of Evernote’s search function means that it is an excellent tool for maintaining a personal digital library and saving the content that you always want to find again. It is flexible enough to be used as a way of managing your entire collection of notes, links and articles. The problem with that power is that it can be easy to clog up your account with too many items,  so in the next post in this series we’ll look at how you can avoid filling up your Evernote by combining it with a bookmarking service.

Image Credit: Bob Kent (1948), Circulation section [picture], State Library of Victoria

Establishing a workflow

If you’ve ever spent a maddening few minutes walking around the house looking for your car keys then you’ll understand the importance of putting things in the right place. Whether it’s keys, sunglasses or digital data, having a set of rules that govern where you place an item helps you go a long way to being organised. The way you store your data, bookmarks, notes and files digitally all comes under the banner of workflow.

Over the next couple of posts we’re going to examine one way of structuring your digital workflow, and look at some useful services for being a bit more organised. We’ll also examine how you can join some of these services together to ensure you’ll always be able to find that bookmark, file or note.

Before you think too much about your workflow, consider where you find most of your information. You might subscribe to newsletters, follow blogs or get updates from Twitter. Also think about the way you access these services and when you do it. For example, do you set aside time each morning to read your feeds, or do you tend to do most of your browsing when you’re on the move and using your mobile phone? When you consider the range of devices you might use and the varied times and places that you’re accessing information, it becomes clear that you need an established routine to follow to make sure you can save that interesting resource for later. Your students probably have an even more irregular routine, so helping them establish a routine becomes really important.

Here’s a simple illustration of a possible workflow routine.

So let’s have a look at the first couple of steps in the process, and consider some of the useful tools that can play a part. Each of the tools we recommend have web and mobile versions, are available for free and also integrate well with each other.

Find

The first step in the process is Find, and we’ll assume that you are already doing that in a variety of ways. Information could be coming to you via:

  • your own web searches and general browsing
  • blogs you follow (you might read these in a service like Feedly)
  • social networking sites like Facebook, Twitter, YouTube & Pinterest
  • social bookmarking and curation sites like Scoop.It, Diigo or Pearl Trees
  • emails from colleagues and face to face meetings

Whatever the information you find, you’ll already be assessing the content for value and making some decisions. A quick scan of a site or article will help you to decide what to do in the next step of your workflow.

Read

Now that you’ve found an interesting resource you’ll need to make a decision about what you want to do next. This could depend on how much time you have, whether you’re on a mobile device (those videos can chew up your data allowance pretty quickly) and whether you’re in the mood to read an article or watch a video. So we need to do a form of triage and decide what we want to read now and what we might want to read a bit later.

The best tool we’ve found for doing this is Pocket. It’s a free service with web and mobile app versions and allows you to save articles and videos for later viewing. Articles are presented in a lovely, clean reading view, and the mobile apps also download all of the content to your device so you can read even when you don’t have an internet connection. Pocket comes with extensions that can be installed in your web browser for one click saving of pages, and it also integrates really well with many of the popular services like Twitter and Feedly.

Here’s how to get started with Pocket.

  • Visit getpocket.com and sign up for an account
  • Install the Pocket extension in your browser. The How to Save page will give you a link to install the correct extension (for Firefox, Chrome or Safari) or a bookmark button for Internet Explorer. Once installed, look for the Pocket icon in your browser’s toolbar. Then you can save any page for later reading.
  • Link your email account to your Pocket account so you add resources via email.  Here’s a guide to the process.
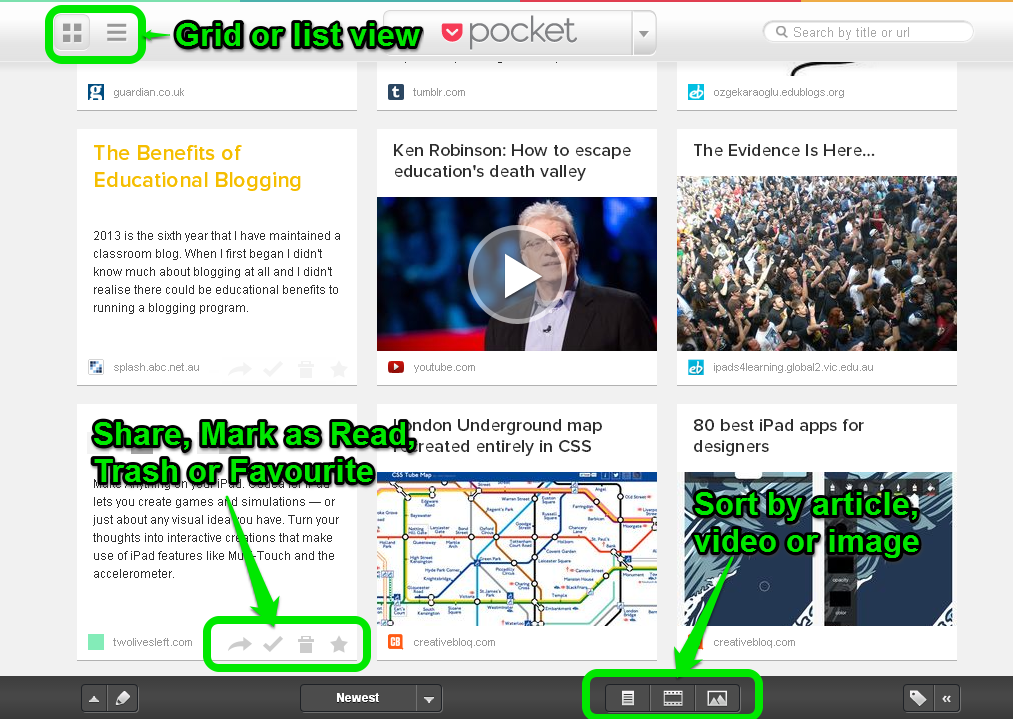
  • You can see your saved articles in your web browser by visiting your queue. The queue can be organised as a grid or list view, can be searched and can also be sorted by article, video or image.


  • Download the Pocket app for your mobile device to read articles on the move. There is also an app for Apple Macs. Search your relevant app store for the Pocket app. Pocket’s mobile app will download your content so you can view it even when you don’t have an internet connection (perfect for the train).
  • Keep an eye out for the Pocket icon appearing in other services like Twitter or Feedly to make saving easier. We even include a Pocket icon at the bottom of each Bright Ideas post so you can save it for later. If you have Pocket installed in Chrome and login to Twitter then you’ll see the saving option appear under tweets with links (look for the more icon if you can’t see it). The best bit is that on mobile devices and the Mac app Pocket will also show you the original tweet, so you know where you discovered it. Genius.

    One click saving from Twitter makes it easy to save the tweet and the link

The Pocket mobile app has a number of sharing options, making it a pivotal tool in your mobile workflow.

Once you have viewed the item in Pocket, your next decision will be what to do with it. You can choose to mark the item as read, which will keep it in your Pocket archive. Selecting Trash will remove the item completely from your library.

You will also need to decide whether the resource should be moved into the next two areas of your workflow, store and share, which we will explore next. Fortunately Pocket includes a number of options for sending the article to other services like Twitter and Facebook. The Pocket mobile app also has even more options for sending to services like Evernote, Diigo, Delicious or Tumblr. Look for the arrow icon and join up the services you use.

Pocket can play a valuable part in your workflow as a holding pen for interesting resources. It integrates well with a wide variety of other services, making saving to Pocket and then storing or sharing a simple process.


Image credit: State Library of Victoria, photographer (1954), Basement of Dome building showing deteriorating stacks of newspapers and books, State Library of Victoria


Clip web pages to Evernote with Dolphin Browser for iPad

We’ve made no secret of our love for Evernote here at Bright Ideas, as it’s one of the best ways to keep notes and bookmarks together. One great feature of Evernote is the Web Clipper which works in most major web browsers and makes it easy to save articles for later reading. But on the iPad it’s a bit of a different story, as the iPad’s built in Safari browser doesn’t integrate very well with the Evernote web clipper.

We’ve written about a rather complicated solution to this problem in the past, but this tends to be a bit unreliable. A much more sturdy solution has now come along in the form of the free Dolphin Browser for iPad. Dolphin integrates with Evernote to make saving web pages to your account easy.

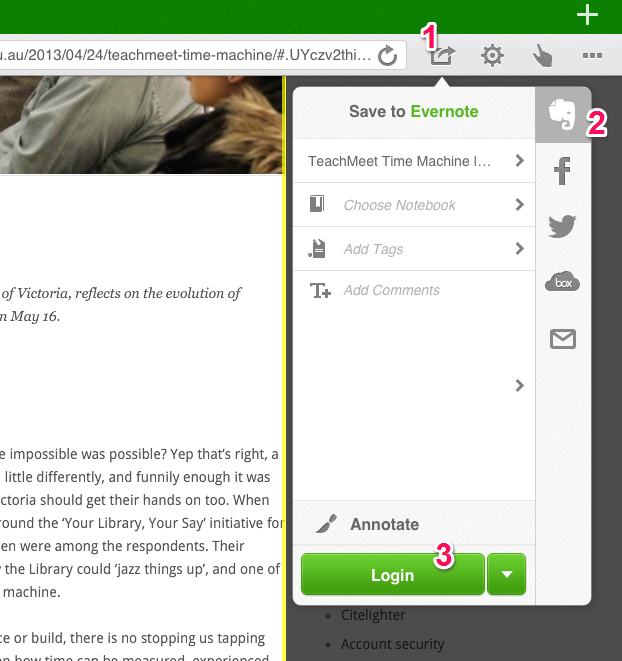
To set up Evernote integration, first install and open the Dolphin Browser for iPad app. When you find a page you’d like to save follow these steps:

  1. Select the sharing button (a small rectangle with an arrow)
  2. Select the Evernote elephant logo.
  3. Choose Login (you should only have to do this once).
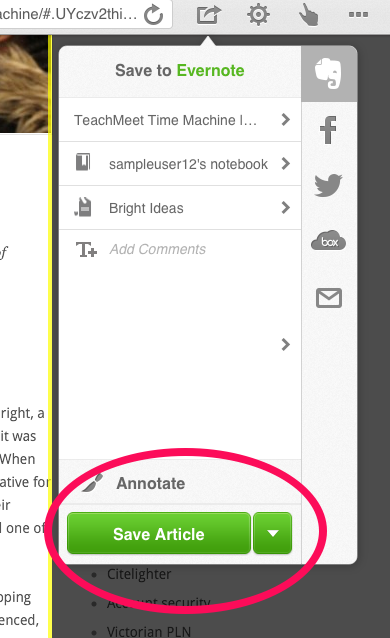
Once you’d entered your Evernote login details you will see the Save Article option (circled below). The small drop down menu next to this button lets you choose to save the entire web page instead. You can also add tags, choose the notebook to store the note in and add comments. When you are happy select the Save button. The page or article should now be saved in your Evernote account for posterity.

Dolphin browser also has some interesting features apart from Evernote integration, including the option to draw commands on your screen (for example you could draw a G to take you to Google). It’s well worth a look as a good alternative to Safari.

The one draw back is that unfortunately Apple still don’t let users choose their default web browser (unless you want to jailbreak your device) so you’ll have to remember to open Dolphin for your browsing sessions instead of Safari. Hopefully with the upcoming IOS operating system upgrade this option will finally be available to users of Apple devices. But if you are a regular user of Evernote and you own an iPad then it is definitely worth remembering to use Dolphin browser to make saving those articles easier.


Bamboo Dirt: I need a digital research tool to …

Whenever we are faced with learning new skills or new methods we tend to focus on the tools. However, when we shift our focus from  the tools to what can be done with them, real transformation occurs. Mastery and success become possible; it’s the same whether you are learning to paint with oils or teach research skills at a 1:1 netbook/iPad/BYOD school.

Bamboo Dirt is an online registry created to help educators make that shift. Its focus is on research tools and the Bamboo Dirt search function is organised around the idea of purpose.

Bamboo Dirt’s home page offers lots of browsing categories based around tasks. Categories include:

  • visualise data
  • organise research materials
  • manage tasks
  • manage bibliographic information
  • communicate with colleagues
  • author an interactive work
  •  build and share collections

Users can also search or browse by keyword, tags, recommended resources, and new resources. Each result has a short description plus information on cost, licensing and platforms.

You can make the site even better by joining and contributing. Registration is free and members can:
  • add resources
  • review them
  • comment/describe how you have used a tool
  • recommend good resources and those appropriate for beginners
  • submit tips and tricks to help others understand the value of the tool
This service is an ongoing collaborative effort between Bamboo Partner Institutions (UC Berkeley, UChicago, UW Madison), Bamboo affiliates (University of Alabama, NINES), and individuals dedicated to helping connect people with digital resources. It’s a welcome addition to any educator’s  research toolkit.


New Libguides from the State Library of Victoria

Librarians at the State Library of Victoria answer complex reference questions for patrons everyday, whether it be onsite, via email or on the phone.

After years of experience with the questions people bring to the collection, reference librarians have developed over forty library guides looking at specific research topics.

The guides are aimed as a one-stop shop for subjects like bushfires in Victoria, court cases in Australiaearly Australian census records and more.

Each libguide gives background information on the topic and the Library’s holdings, key resources and related web links.

Recently published guides include:

And if you’re wondering what a reference librarian at the State Library does when they get an inquiry, here’s a video about the process.

Tags: You’re it!

Students and educators are embracing all the advantages of digital technology; they are writing blog posts, sharing annotated diagrams and photos, creating video clips and much, much more. Many of these digital items are being uploaded/shared in the hope of attracting an audience and engaging in real world conversations for authentic learning. So, why do some items receive a lot of attention, while others are ignored? Often it is because of the way an item has been tagged, which makes the item much more ‘findable’.

Tags are words or short phrases attached to items posted online. You might see them on blogs, wikis, and social bookmarking sites; you’ll definitely find them on social media sites such as YouTube, Flickr, Tumblr, and Facebook. (It’s even possible to add tags to your own Word documents and all the photos saved on your hard drive.) New media explorer and consultant, Robin Good explains them simply as:

… short keywords that define what your online digital content is all about.

Social Media Word Cloud

Social Media Word Cloud by Rubber Dragon (Flickr CC)

Why tag?

Tagging is the primary way of labelling items on Web 2.0 sites so they can be easily found when searching/ browsing, but it can also be used for:

  • organising
  • classifying
  • applying identity/ownership

While tags look like keywords, they work a little differently. Tagging is an informal system and often a personal one; tags are chosen and assigned by the creators (and sometimes the viewers). This can make a search more meaningful or less so, depending on the creator’s and user’s understandings of the tag words attached. By including tags that go beyond browser-assigned keywords, the content becomes even more accessible. On many sites, tagging is a collaborative activity, so the more people tag on an item/site, the more accessible items become and the more useful the site becomes. Tags  also increase searchability because they are normally visible on pages so can actively link users to related items with the same tags.

Smart Tagging

If you have never tagged in item before (or even if you have), here are a few tips:

  • choose tags that are descriptive
  • choose tags that are specific
  • be comprehensive (most sites allow you to tag generously)
  • think like your potential audience, choose tags effective for their searches
  • tag with singular and plural forms of a word, if relevant
  • use suggested tags, if relevant (many sites have tools that offer suggestions)
  • do a little scouting on the site you are using (eg. Flickr) to see what tags others are using to describe items similar to yours
  • do the same on Google to see what comes up (Tip: watch Google’s auto-suggestions as you type in search terms)

Understanding and using tags is a digital literacy skill that any teacher can discuss and encourage with students, and one that could generate positive results for your students’ online efforts.

Research skills: searching strategies

Research is a process. Think of it as a series of problems we solve as we come to them. The more problems we solve, the better we become at doing research; because we bring our new knowledge to the next problem we have to solve. So, where do we start?

1. Understanding your question

It’s important that you understand what you are trying to find – dictionaries, the internet, or books can help.

Take the following question as an example:

Women’s lives in the seventeenth century

The research topic is rather straight forward, but then we might wish to draw some boundaries such as’ where’? In England? In Australia? Or in a specific community?

2. Identifying the concepts in your research question

Women’s lives in the seventeenth century in England

We have three concepts here: 1) women, 2) lives, and 3) 17th century

3. Brainstorm synonyms for the key concepts

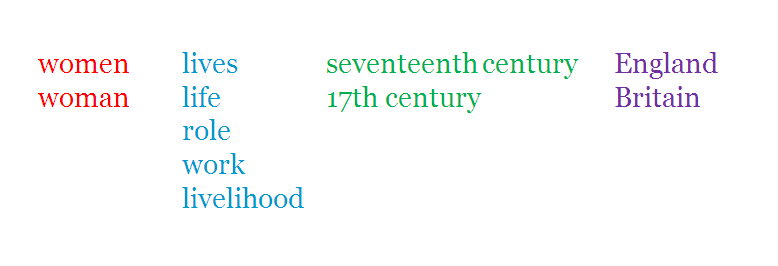
Using different combinations of synonyms for your search. Be aware of spelling variations (eg civilisation and civilization), and the differences of word usage in different parts of the world (eg. bathers and togs, or bush and forest). See below for an example of the different synonyms we could use for our search.

4. Search

Now comes the fun part: search by stringing the concepts together. You do not need to use ‘AND’ when searching the internet, library catalogue, or databases because the ‘and’ function would have been built into the system and set by default. Try searching in as many combinations as possible using the synonyms you’ve brainstormed. For example:

women lives “17th century” England
(note: I’ve used the ” “sign to ensure that 17th century stays together and in that particular order)
or
woman role “17th century” England
or
women livelihood “seventeenth century” Britain

5. New knowledge gained

You’ll find that you’ll gain new knowledge as you gather your information, and this could influence you to change your question to something a bit more specific – and that’s quite alright. Good luck!