Using Postach.io to blog with Evernote

Whilst Evernote is an incredibly powerful organisational tool on its own, one of the most exciting aspects of the service is the way it connects with other tools. One such service is Postach.io, a new platform that lets you blog from your Evernote account. 

Use the ‘published’ tag in Evernote to publish your work

Postach.io works by connecting with your Evernote and creating a blog from your notes. You define which Evernote notebook it can access and notes will only be published on your blog once you tagged them ‘published’. You can also set notes to appear as pages rather than posts by tagging them with the tag ‘page’. If you want to unpublish you can just remove the tag or drag it out of your notebook.

Postach.io blogs come with a number of different themes and there are also options to modify a theme if you know how to code. The theme editor options aren’t as easy to use as the visual theme editors in Global2, Edublogs or WordPress, so if you can’t code you only have the option of prebuilt themes at this stage. I’d expect that as the Postach.io user base grows (the service is still in Beta at the moment) that more themes will be shared by users. 
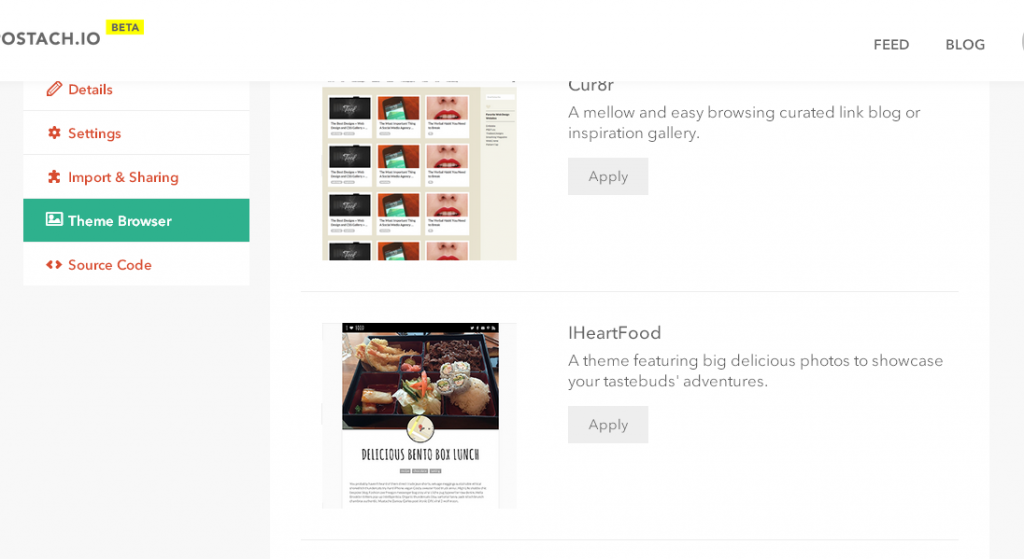
Postach.io comes with a few built in themes and the source code can be edited to create your own theme

One of the advantages of Postach.io is that all of your blog content is stored in your Evernote account. We’ve seen the angst caused in recent times with the closure of online services like Posterous, so storing your data in a service like Evernote, which syncs back to your computer, reduces the risk of data loss. It also means you are investing less time and effort in a single platform- if Postach.io doesn’t suit your needs you just close down your account and take your data with you. Hopefully this signals a move towards more data portability between online tools.

One other advantage of Postach.io is the wide range of apps produced by Evernote. Evernote works well on almost any device, either through desktop software, web browser versions or mobile apps. All of the Evernote apps are free, so you don’t need to buy a specific app to get blogging on your mobile device. You could even use the Evernote email feature to create blog posts via email (which coincidentally was a much loved feature of Posterous).

The Postach.io developers recommend you create your blog entries in the web browser version of Evernote, as many of the formatting options are the same as traditional blogging software. We built a sample Postach.io blog and decided to test out some of the standard blogging tasks like formatting text, adding images and embedding media. This included trying to recreate some recent posts from Bright Ideas. Creating simple notes with bullet points, text formatting and images was all as easy as creating a new note in Evernote. Postach.io also coped quite well with embedding media from popular sites like YouTube, Flickr and Twitter (see our test post here). There seemed to be very little lag time between a note being updated in Evernote and the changes being reflected on the Postach.io site which is very promising. Comments can be enabled using the Disqus service and your blog avatar can be updated using Gravatar. Postach.io blogs also include RSS feeds and tagged posts.
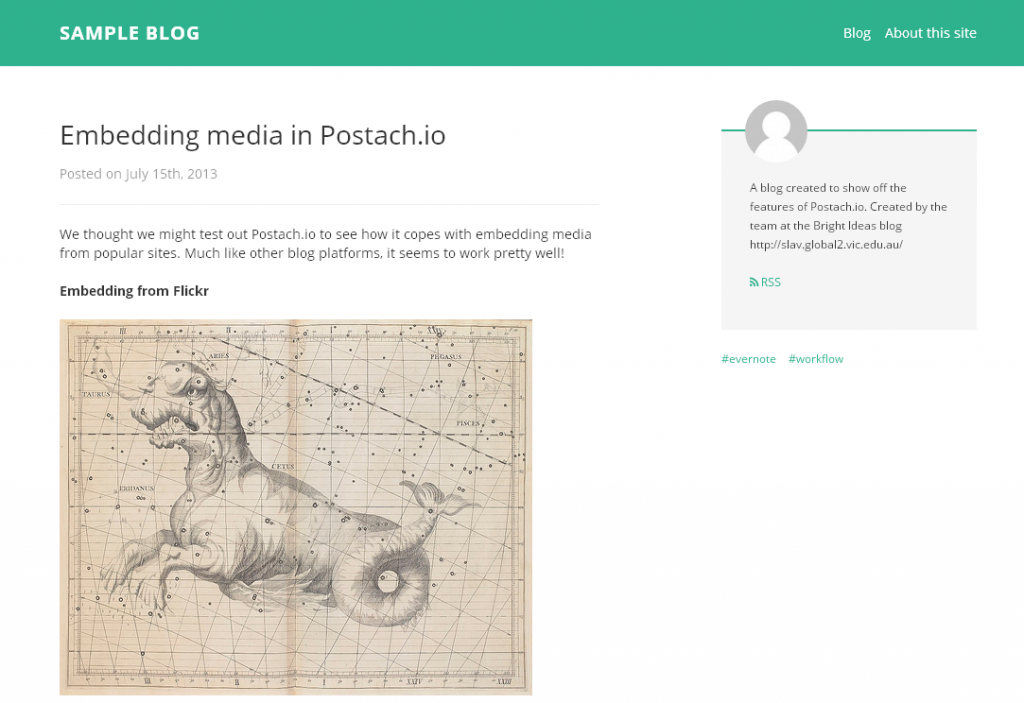
Postach.io lets you embed media from popular sites like YouTube, Flickr and Twitter. Click on the picture to see our sample post.

Nevertheless, we did find some elements of Postach.io lacking in comparison to standard blogging platforms. There is less control over items like captions and alt text, and it obviously lacks some of the fabulous features of Edublogs and Global2 like student blog management. Postach.io also ran into problems when we tried to attach files to a note; the text of the note appeared as a post but the attachments were not added. I also found that not being able to see a preview of my post until it was published was quite limiting, so if you are someone who likes to triple check your posts before they are published then this might be a difficult adjustment to make.

But what Postach.io does represent is  an easy way to create simple blog posts very quickly. Postach.io harnesses the power of Evernote to simplify the blogging process and also shows the value of developers building services that work well with other apps.

It’s not a replacement for a fully featured blogging platform like Edublogs (particularly if using it in the classroom) and the service is still in beta so you can expect bugs and downtime. Despite some limitations, Postach.io could end up being a great way to introduce beginners to the concept of blogging or to create simple blogs with very little effort, particularly if you are already using Evernote.

Check out our Sample Postach.io blog and see how the notes originally appeared in Evernote.

New to Evernote? Have a look at our guide to organising yourself


Tame those bookmarks

So far in our digital workflow series we’ve looked at ways to triage information for later reading, and also how to save interesting articles or resources to our own digital library. Using a short term tool like Pocket along with a long term storage tool like Evernote makes for a powerful combination, but we also need to consider how best to share with other people. It’s here that we look at the next step of the workflow process- share.

Share

Sharing our own work or promoting resources created by others is an important aspect of being a valuable member of our network. Think about all of the great resources you’ve found online, and how you found them. These resources were created and shared by someone. They were then promoted by others, either on social media, through bookmarking sites or by linking in blog posts. Everyone involved in that process has played some part in bringing that great resource to your attention, so by adding our own thoughts or recommendations then we pass that resource on to others.

One great way to do this is through a social bookmarking tool. These tools let you bookmark great resources to build your own library of links, and they also let you share with others. They are a much better alternative to the old workflow of bookmarking that might work something like this:

  • find a great site
  • bookmark it in your browser
  • email it to yourself
  • email it to your colleagues

But this process has some problems:

  •  your browser bookmarks will probably quickly become unmanageable
  •  you will email it to yourself, not have time to look at the link and then put it in a folder marked Later or Stuff (which you’ll never check)
  • your colleagues will be busy, and drag it to their own folder marked Later or Stuff (which they’ll never check). Then you’ll eventually decide that you don’t want to bog them down with emails
  • you and your colleagues miss out on those great resources

So instead of that process, let’s find a better way to save those bookmarks, and put them in a place where anyone can find them when they need them. To do this you can use a social bookmarking tool, and one of the best around is Diigo.

Here’s a brief introductory video showing how Diigo works.

How to get started with Diigo

  • To get started with Diigo, visit diigo.com and sign up for an account.  There is also an option for an upgrade to free educator accounts if you sign up with an email address from a registered educational domain (such as Edumail)
  • The one problem with Diigo is that adding your first bookmark is quite a complicated process, and until you get your first bookmark added the library page is a bit bare. So we’ve put together a complete guide to getting started with Diigo, including installing a toolbar in your browser, organising your library and much more.
  • Once you’ve added a few bookmarks to your library, explore the annotation, highlighting and sticky note features of Diigo.
  • Now that you are building your own library, why not search for groups of educators with interests in your subject area? One great group to join is VicPLN, which includes a wide range of general teaching and learning resources. Click this link, request to join (select Join this group)and when you’re approved you’ll be able to share your favourite resources with the group. You can also comment on links and save any links you love into your own library by selecting More>Save.

    You can comment on the links of people in your group, and also save their links to your personal library

  • Now that you’ve seen how Groups work, form your own group within your school. Instead of emailing interesting links to colleagues make sure that you all share them into the group, so they are there when anyone needs them. Use tags to organise your resources into subject, year level or topic. You could also create groups within your classes and have students post interesting links as they complete their research (make sure you get an educator account to do this).
  • Now that you’ve worked out a place to store your new bookmarks, think about what you want to do with those bookmarks you’ve accumulated over the years. If they are all stored in your browser then you might think about exporting them all to a file and them importing them into Diigo. Look for the export option in your browser’s bookmark manager, and when you’ve exported all the bookmarks to a file visit Diigo Tools. Choose Import, select the file and import them into your library. Or, you might like to declare ‘bookmark bankruptcy’, get rid of all of your old bookmarks and just start again from scratch. It’s a big step, but might be worth it!
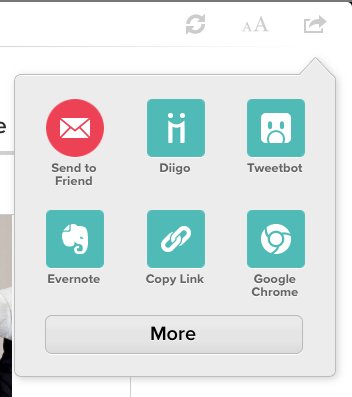
  • If you are using the mobile version of Pocket, look for the Diigo option in the sharing menu. Hook up your Diigo account to make saving great articles from Pocket direct to Diigo.

    Pocket’s mobile app includes an option for saving your articles to Diigo

  • Lastly, now that you’ve organised your bookmarks into Diigo, think about what bookmarks you still need in your browser. These should only be pages that you visit regularly, and ones that you need for quick access. Try to keep your browser bookmarks down to your most used websites (email, banking, newspaper, RSS reader, social network, Evernote, Diigo etc) and put anything less important into Diigo, where it’s safe but not in the way.

    Get your browser bookmarks in order and only save your most visited sites in your browser

The only thing to consider now is what you want to save to Diigo, compared to what you want to save into Evernote. Diigo doesn’t store pages forever (unless you pay for a premium account), so basically if you want to make sure you’ll always have access to the contents of an article, clip it into Evernote. If the page is that valuable then you probably want to save the bookmark and share it to your Diigo followers or groups as well. If you are not sure whether you’ll need the page in the future, but want to have that option, then that’s the perfect page to bookmark just in Diigo.

Diigo (or other social bookmarking tools like Delicious or Kippt) are the perfect option for saving your own bookmarks and also for sharing interesting resources without feeling like you are pushing them on other people. Using Pocket, Evernote and Diigo and having a clear idea about the role of each tool means you will always be able to find that resource that you need, when you need it.

Of course, there are a number of other ways to share the resources you find, such as on social media, through curation tools or even in person. In the final post of this series we will look at other ways to share, how to streamline your workflow by joining these tools together and also how to reflect more deeply on resources you’ve found.


Workflow and the digital spare room

Your information workflow is a set of rules that govern how you find, read, store, share and reflect on information. In the first post of this series we explored the first two steps of this process and how you can make use of a read later service like Pocket to organise your reading for more convenient times. One you’ve done that reading, you need to move to the next step in the process, which is deciding whether you’d like to save the content so you’ll always have access to it.

Store

It may seem strange that in a time where information is so easily accessible online that we would want to save a copy of that information for ourselves. You might think that it’s easier just to bookmark the page and visit it whenever you need. But that ignores the dynamic nature of the internet. An article might be edited, the url of the page could change or the page or entire site could even be taken down. So in those cases it is best to save your own copy of the page for later reference.

This doesn’t necessarily mean that you should save every page that you come across. There are a number of tools that make it so easy to save articles that you could fall into the trap of having too much information in your ‘digital spare room’. It can mean that you end up being overwhelmed by the amount of pages you’ve saved. So once you’ve read that article, consider this question:

Is this something that I will want to revisit regularly and is it critical to my work or interests?

If the answer is yes, then save it to your account. If you are unsure, then our advice would be to bookmark the page instead (we’ll talk about bookmarks in the next post in this series). If the answer is a resounding ‘No’ then get rid of it completely.

Why don’t we want to just save everything we read? Think of it this way. When you save pages, you are building your own library. That library is fully searchable, but the more you put in there, the more cluttered your search results will become. You’ll soon find that you’ll need to organise your resources into categories, or cull parts of your personal library to make it easier to find what you need. Pretty soon that tool that was supposed to make your life easier becomes just another chore that needs to be completed. If you’ve ever cleaned out your spare room or filing cabinet and wondered “Why did I save this to start with?” then you’ll know what we mean.

So once you’ve read that article online or in Pocket, make the decision about whether you want to save your own copy. If you do, then Evernote is the place to do it.

We’ve written about Evernote many times and even though there are competitors that do similar things (such as OneNote and Springpad) we still find Evernote to be the best way to store and sort information. Your library will synchronise across all of your devices (including mobile) and it’s a great way to manage your own notes, audio and pictures. But Evernote becomes even more valuable when you make use of the Evernote web clipper tool. This extension sits in your browser and lets you save the contents of any web page (except for video) to your Evernote account. That way even if the page is changed, you’ll always have the original version.

Here’s a video showing you how the web clipper works in your browser.

How to get started with Evernote:

  • Sign up for an account at evernote.com Free accounts are limited to 60mb of uploads a month (which is plenty for most people).
  • Install the Evernote web clipper by visiting this page and selecting Get Web Clipper (if you use Internet Explorer then you’ll need to install the full version of Evernote on your computer- this will then install the Evernote web clipper in your browser).
  • Install the desktop version of Evernote for Mac or PC here.
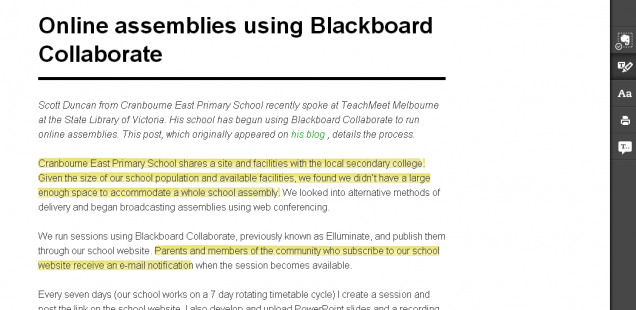
  • Install the Evernote Clearly extension in your browser. This extension provides a cleaner reading experience and also lets you highlight text with different colours before saving to your account.

    Evernote Clearly removes any extra detail on the page and lets you focus on the article. You can highlight text and then save to your account.

  • Evernote has a range of mobile apps for most popular mobile phones and tablets. Find them by searching your app store. There are also a number of other official Evernote apps that you can use, such as Skitch (a screenshot annotation tool) and Evernote Hello (which manages contacts and business cards). This page include links to all official Evernote downloads and products.
  • We’ve created a comprehensive guide to getting started with Evernote, including how to create new notes, organise your library and share notes or notebooks online. There are also a number of guides on the Evernote site for using the different versions of Evernote
  • You can also make life easier by locating your unique Evernote email address and sending any interesting articles there. This will create a new note in your library is a much more efficient way then emailing yourself. Find out how here.
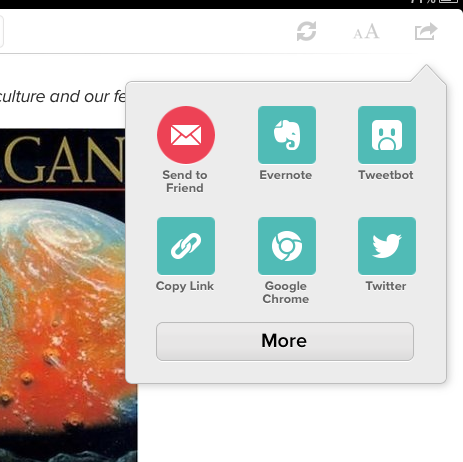
  • If you already use the mobile version of Pocket then make sure you connect your Evernote account into the Pocket app. This is one of the easiest ways to save articles to Evernote from mobile devices. In Pocket, look for Evernote icon under the share menu (see the iPad version below). If you can’t see the Evernote icon select More. Login with you Evernote details, and when you want to save an article you can do it with one click. (see the iPad screen grab below for an example).

Saving to Evernote on a mobile device can be difficult, but fortunately Pocket includes the option to connect your Evernote account

So that’s how Evernote can be used in the Store phase of your workflow. The power of Evernote’s search function means that it is an excellent tool for maintaining a personal digital library and saving the content that you always want to find again. It is flexible enough to be used as a way of managing your entire collection of notes, links and articles. The problem with that power is that it can be easy to clog up your account with too many items,  so in the next post in this series we’ll look at how you can avoid filling up your Evernote by combining it with a bookmarking service.

Image Credit: Bob Kent (1948), Circulation section [picture], State Library of Victoria

Clip web pages to Evernote with Dolphin Browser for iPad

We’ve made no secret of our love for Evernote here at Bright Ideas, as it’s one of the best ways to keep notes and bookmarks together. One great feature of Evernote is the Web Clipper which works in most major web browsers and makes it easy to save articles for later reading. But on the iPad it’s a bit of a different story, as the iPad’s built in Safari browser doesn’t integrate very well with the Evernote web clipper.

We’ve written about a rather complicated solution to this problem in the past, but this tends to be a bit unreliable. A much more sturdy solution has now come along in the form of the free Dolphin Browser for iPad. Dolphin integrates with Evernote to make saving web pages to your account easy.

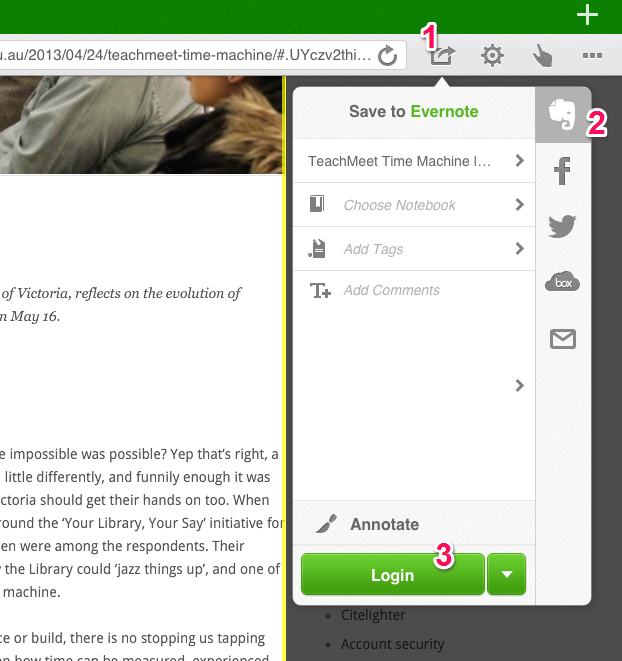
To set up Evernote integration, first install and open the Dolphin Browser for iPad app. When you find a page you’d like to save follow these steps:

  1. Select the sharing button (a small rectangle with an arrow)
  2. Select the Evernote elephant logo.
  3. Choose Login (you should only have to do this once).
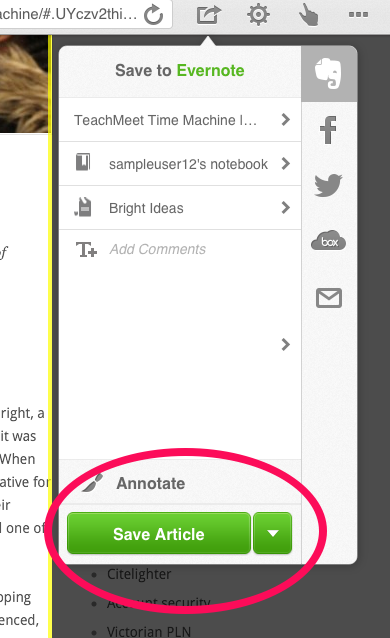
Once you’d entered your Evernote login details you will see the Save Article option (circled below). The small drop down menu next to this button lets you choose to save the entire web page instead. You can also add tags, choose the notebook to store the note in and add comments. When you are happy select the Save button. The page or article should now be saved in your Evernote account for posterity.

Dolphin browser also has some interesting features apart from Evernote integration, including the option to draw commands on your screen (for example you could draw a G to take you to Google). It’s well worth a look as a good alternative to Safari.

The one draw back is that unfortunately Apple still don’t let users choose their default web browser (unless you want to jailbreak your device) so you’ll have to remember to open Dolphin for your browsing sessions instead of Safari. Hopefully with the upcoming IOS operating system upgrade this option will finally be available to users of Apple devices. But if you are a regular user of Evernote and you own an iPad then it is definitely worth remembering to use Dolphin browser to make saving those articles easier.


The danger of a free lunch

Closing Down - Last Day

Closing Down – Last Day by _4cryingoutloud

The imminent closure of popular blogging platform Posterous highlights one of the drawbacks of free online tools. Trusting any online service with your data or even your time in building a site means that it is important to be vigilant and well informed so you are not inconvenienced further down the track.

The development team behind Posterous has been acquired by Twitter, and Posterous is due to close down on April 30th.  This leaves many users looking for another site to host their blog and an easy way to migrate their data. Fortunately in this case there are a number of options for migrating a Posterous site into similar sites like WordPress or Tumblr.  Posterous users will surely miss the easy to use blogging service, but the minor inconvenience of migrating their site is a much better outcome than facing a task of manually exporting data, or worse, losing your data entirely.

In the online world, the theory that ‘there is no such thing as a free lunch’ is clearly evident. It’s an important lesson that should be considered when evaluating the use of any online tools. Many of these services host large amounts of data and require constant maintenance, meaning that all free services still have the cost of providing server space and employing staff. The business models of most free online services tend to loosely fall into the following categories:

  • Building a strong user base and then being acquired by a larger company (as in the cases of Posterous & Instagram). This model probably makes a service more likely to be discontinued. Users can only hope that a service will be acquired and continued (like Facebook’s purchase of Instagram), rather than being acquired merely for the talent of the developers (like Twitter’s purchase of Posterous).
  • Making money by serving up advertising to users. Google, Twitter & Facebook are the best examples, and all three services analyse your data to serve up targeted ads. This has led to some backlash from users about invasions of privacy. However, those with a more reasonable view realise that advertising supports the service. My advice is this, if you use a free service (or even visit a free website) then advertising is a fact of life. The cost of a newspaper or magazine is subsidised by advertising, and the web is no different. Our personal data makes an attractive proposition for advertisers, and if that is a problem for you then it may be best to avoid these sites.
  •  The ‘freemium’ model, which offers premium paid services to power users and limits the features offered to free users (Evernote’s premium accounts and Dropbox’s paid storage upgrades are good examples. Google Apps also falls into this category). In some way this may be the best option for users and providers. Data tends to be better protected, paid users get important features and innovative new features are added as a way of enticing people to upgrade.
  • A fully paid model. One interesting new site using this model is Pinboard, a bookmarking site that is a paid service. The developer promises that this will provide a level of privacy and data protection not found in free services
  • No business model at all and no way to make income from a service. I’d advise you to avoid using any service like this, particularly if investing your time or data (read about the closure of Megaupload as a classic cautionary tale). 

When using any free service, it’s important to consider these models and the implications of storing your data with them. Check out a site like How do they make money? for a guide to the models of popular services. Always read the Terms of Service and Privacy Policy and explore the options for exporting your data before you invest a lot of time and energy into a site (this is doubly important if you are recommending your students use a service).

Every time you commit your data to a site you need to do some risk assessment and consider ways to reduce the risk. For example, if you use a service like Google Drive, Evernote or Dropbox then your data can also be synchronised back to your computer as well, so at least you have a local copy of the data. This is particularly important for files like photographs. Also consider using a tool like If This Then That  to automatically back up your data from one service to another.

Remember to also consider the type of data that you are uploading to online services. Do some research about a service to see if they have had privacy breaches in the past, and think about the implications of the data you upload being accessed by someone else. For example, if you want to use Evernote to record student data then make sure it is only stored as a local notebook on your computer, rather than being uploaded. It’s not as convenient, but it’s an important step in protecting data.

Online services provide an amazing level of convenience, letting us stay organised, share our lives and work together. This convenience does also require us to stay informed and consider our use of these tools. In this way you’ll ensure that you’ll never lose that important data that means so much to you.


Evernote on the move

With the weather improving now is the time of the year when many students are heading out on city experiences, excursions and orientation programs. As students explore, answer questions, conduct interviews or take photographs they will need to find a way to keep all of their work organised and the perfect tool for keeping all of this work together is Evernote.

We’ve written many times about the virtues of Evernote as a note taking, research and organisational tool. But Evernote also has a number of features that makes it ideal for use before, during and after excursions. Here’s how it could be used:

  • Students could conduct all of their planning before the trip and organise an itinerary or task list. Checklists can be created in Evernote, so students heading out on a self paced city experience or conducting fieldwork could have their day planned out in a checklist. They could also share their notes with the surpervising teachers so each teacher has the itinerary of each group
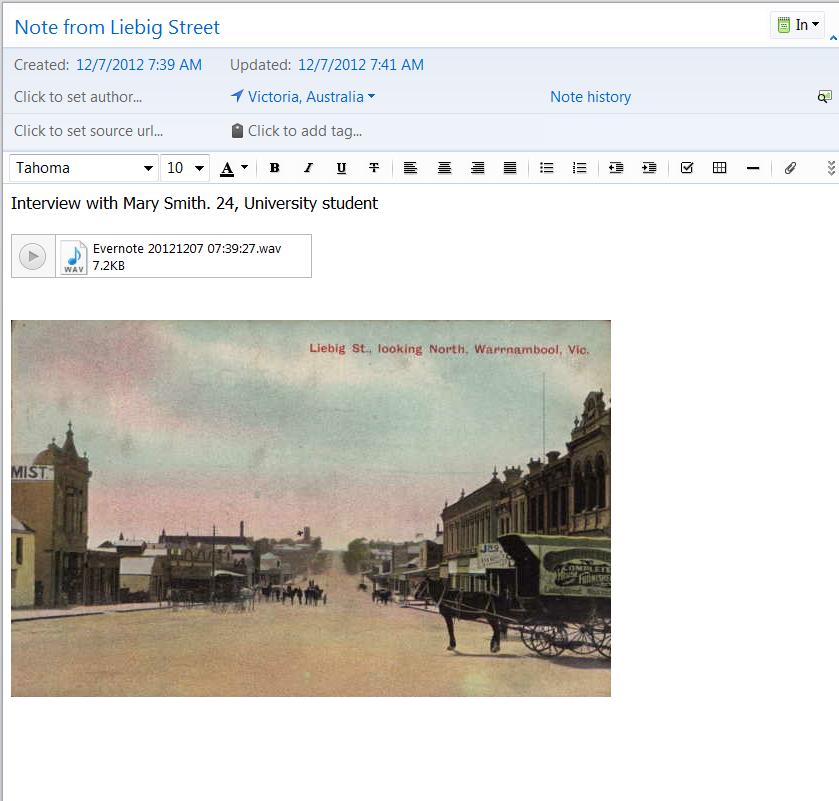
  • Notes can include text, hyperlinks, audio recordings and photographs so students can record their reflections or observations in a number of different ways. This means that students are considering the best way to capture their work during the day, and also presents them with more options when they return to school than a standard text report.

Notes can contain text, images and audio recordings


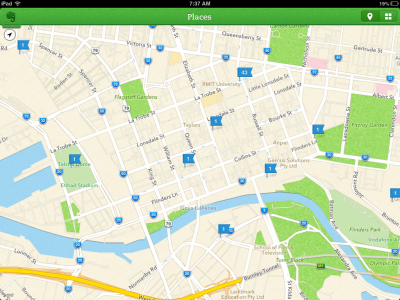
  • All notes can be automatically tagged with a geographic location, making it much easier for students to find the work they are looking for based on the location of a note. Students completing fieldwork or city experiences will have a comprehensive record of the day with notes sorted via location. You can also add location details onto notes manually. Use this handy tool to find the latitude and longitude of any location on Google maps.

Evernote’s Places view shows all geo tagged notes on a map

  • Because notes can be added into a shared online notebook teachers could be receiving automatic updates of the work of students. This would be particularly useful for those programs where students are out on their own for a number of hours. Seeing that real time update of student work while you are sitting in a coffee shop gives that added peace of mind that your students are active and, more importantly, safe. This is another benefit of the geo-tagging feature of Evernote notes.
  • Evernote integrates well with the annotation tool Skitch. This means that students could use Skitch to annotate photographs of places they visited, or annotate maps.
  • One of the great hassles of having students collate all of this information on excursions is getting all of the content off the device and on to a computer. But because Evernote synchronises online it means that everything will be waiting for your students back at school to get started. If your students are able to access free wifi in the location they are working then they can even synchronise their notes during the day. If they lose their device, at least the work has been backed up in the cloud.
  • After the excursion your students can use Evernote to complete their work about the day. Evernote also lets you share notes to the web, so it works well as an easy to use publishing tool for sharing reports or digital stories.

It is important to note that if you are a non premium user of Evernote (not a paid user) that notes can’t be viewed on a mobile device without an internet connection. Consider this if you want students to be able to access their notes created before the event.  However, notes can be created in the mobile app even if you are offline, then synchronised back when a connection is available. Increasingly you will find that many places your students visit will have free wifi available.

Let us know if you’ve used Evernote with students on excursion, or how you’re planning to use it when your students next head out of school.


Supercharging Evernote

Evernote is a useful tool for staying organised and keeping your notes synchronised across all of your devices. After exploring the uses of Evernote in the classroom last week, let’s look at two ways to make Evernote even more useful- note linking and bookmarklets.

Note linking is not a well publicised feature but it has some really useful applications. Using the desktop version of Evernote you can find a direct link to your note and then hyperlink to it. Then when you click on the hyperlink the related note will open up automatically. Students could use these links to build a to-do list for the week, with direct links to a new note for each task they have to complete.

Use note links to build an interactive to-do list

Have a look at our video showing you how to build a to-do list using note linking.

Adding bookmarklets to your iPad (or iPhone) browser is also a great time saving option. One of the problems with the iPad is that it is time consuming jumping between apps. If you are reading a page in Safari and want to save it to your Evernote account you need to install a special shortcut (called a bookmarklet) that will do it for you with a few clicks. Our tutorial video below takes you through the (rather complicated) process of installing an Evernote bookmarklet on the iPad.

You can also install other bookmarklets for useful services such as Pocket, Instapaper, Diigo and more. The process is similar to the one outline in the video, so visit this page or do a search online to find the codes you need to make the bookmarklets work.

Remember to subscribe to the Bright Ideas YouTube channel to stay up to date with all of our video tutorials.

All about Evernote

This week has seen the start of Research Toolkit, the first ever Victorian PLN short course. Over the next four weeks 150 educators will be exploring search skills, useful tools and digitised resources in this online course. The participants have been exploring Evernote in the opening unit so it seems fitting to have a look at some resources for making this service even more powerful.

Evernote is a cloud based note taking tool that works on a wide range of  devices and keeps your notes synchronised everywhere. It allows for text, pictures, photographs and audio recordings. It can even clip entire web pages and save them for later. Notes you create can also be shared online, so it is an easy way to publish to the web as well.


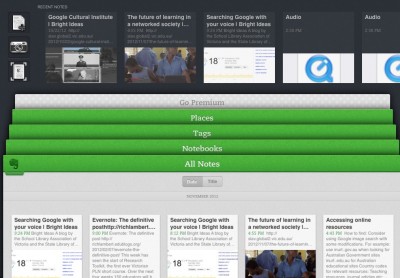
Evernote also recently update their mobile apps

This convenience and power makes Evernote an excellent tool for education. Teachers can use Evernote for lesson planning, sharing notes with students, record keeping and staying organised. Students can keep their notes organised into notebooks, take photographs of the whiteboard (the handwriting will be scanned and is searchable) and access their work across a range of mobile devices. Many teachers are getting their students to create digital portfolios in Evernote. Because everything is stored in the cloud, it also means that a student’s work is transferable. They can take it into the next year level or even take it with them when they change schools. Imagine the possibilities of a student being able to access their writing from a previous year and compare how they have progressed. Or a Year 12 student being able to access their notes from a biology class they took in Year 10!

It is for these reasons that so many educators have become converts to this Evernote. I’m sure many of you are using it from day to day, but here are a few resources that you might explore to make the Evernote even more useful:

And for those of you looking for some simple ways to make your life with Evernote a little bit easier, why not check out our guide to using email to create notes in Evernote?


Moleskine Journal app for iPad

iPad users now have another option for creating and saving notes using the newly launched Moleskine Journal app. This free app lets you create virtual notebooks with text, handwriting, photographs and drawings. These notebooks emulate the style of the iconic Moleskine notebooks.

Moleskine Journal joins a crowded market of iPad notebook apps and challenges popular paid apps like Penultimate and Notability (both $0.99).  But several novel features, an elegant visual style and good integration with Evernote and Dropbox makes the app a worthy alternative.

The launch of Moleskine Journal also coincides with Moleskine’s announcement of physical notebooks that are designed to work well with Evernote.  Page markings within the notebook and special stickers for tagging pages promise to make snapping your handwritten notes much easier. (Find out more at Techcrunch).

We explored the Moleskine Journal app and you can read our first impressions and guide to some of the features in our Storify below.

Download the Moleskine Journal app (Itunes store)


Springpad

In recent times there has been a deluge of online tools that promise to help you organise all aspects of your life. Many services keep track of your bookmarks, notes or contacts, but only a few services try to do it all.  One of the best and most comprehensive is Springpad.

On first impressions Springpad seems very similar to Evernote as it organises items using notebooks and tags. Simple text notes can be created and then added to notebooks. However, Springpad has quite a few features not available in Evernote. Items can be manually added and then grouped into types such as recipes, books, movies, contacts, bookmarks or products. You can also make checklists or create events that can be synced with your Google Calendar.

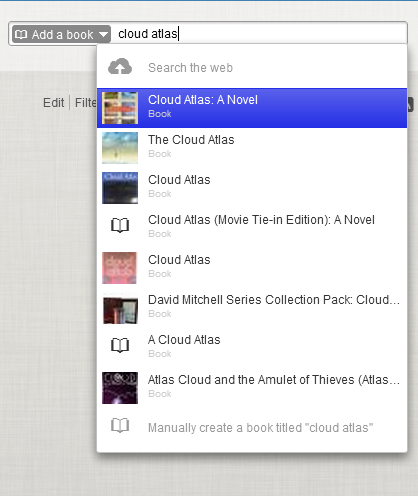
Where Springpad really shines is the search function which helps you to automatically add an item to your collection. You can search for a book title, then add this to your collection, add a short note or review and mark the item as ‘read‘ or ‘want‘. Notebooks can be shared and collaborators can be invited, so you could have students creating their own wishlist of books or building a shared page with reviews of their favourite novels. With categories for film, television, books and recipes Springpad would also be a useful tool for shared curriculum planning for teachers across many subject areas.

Adding a book using search

Adding a book using search

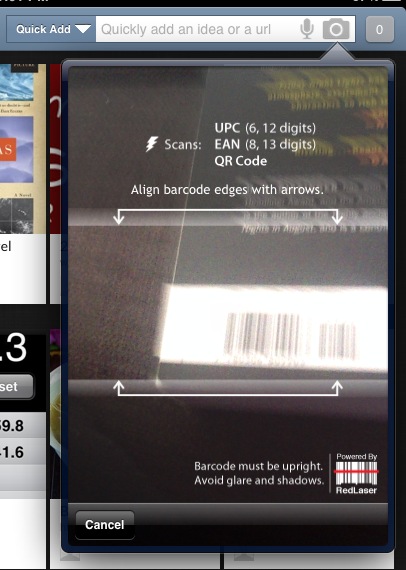
One brilliant feature is the barcode scanner in the mobile app (available for IOS and Android), which lets you scan product barcodes and then add the item to your collection. It’s a great way to quickly index your personal library as the app will also search the web and find cover art and details of the book. This function would also be useful for students keeping track of their research. The app also includes a QR code scanner.

Barcode scanner in the Springpad mobile app

Barcode scanner in the Springpad mobile app

When saving a web page the Springpad clipping tool does a good job of recognising the type of resource you are saving. However, in terms of saving the full text of webpages Springpad is not quite as powerful as Evernote or a dedicated bookmarking tool like Diigo. It doesn’t clip an entire page and then allow you to search within that saved page.  What Springpad does exceptionally well is saving recipes, books, films or products and then automatically adding the details of the item.

Saving an item with the Springpad toolbar

Saving an item with the Springpad toolbar

The lovely visual nature of notebooks combined with easy sharing and collaboration options means Springpad definitely deserves a place on your device. It’s the perfect tool for keeping track of many aspects of your life. With some minor improvements to the web bookmarking feature Springpad may well become the all in one organisational tool that many people have been craving.