Establishing a workflow

If you’ve ever spent a maddening few minutes walking around the house looking for your car keys then you’ll understand the importance of putting things in the right place. Whether it’s keys, sunglasses or digital data, having a set of rules that govern where you place an item helps you go a long way to being organised. The way you store your data, bookmarks, notes and files digitally all comes under the banner of workflow.

Over the next couple of posts we’re going to examine one way of structuring your digital workflow, and look at some useful services for being a bit more organised. We’ll also examine how you can join some of these services together to ensure you’ll always be able to find that bookmark, file or note.

Before you think too much about your workflow, consider where you find most of your information. You might subscribe to newsletters, follow blogs or get updates from Twitter. Also think about the way you access these services and when you do it. For example, do you set aside time each morning to read your feeds, or do you tend to do most of your browsing when you’re on the move and using your mobile phone? When you consider the range of devices you might use and the varied times and places that you’re accessing information, it becomes clear that you need an established routine to follow to make sure you can save that interesting resource for later. Your students probably have an even more irregular routine, so helping them establish a routine becomes really important.

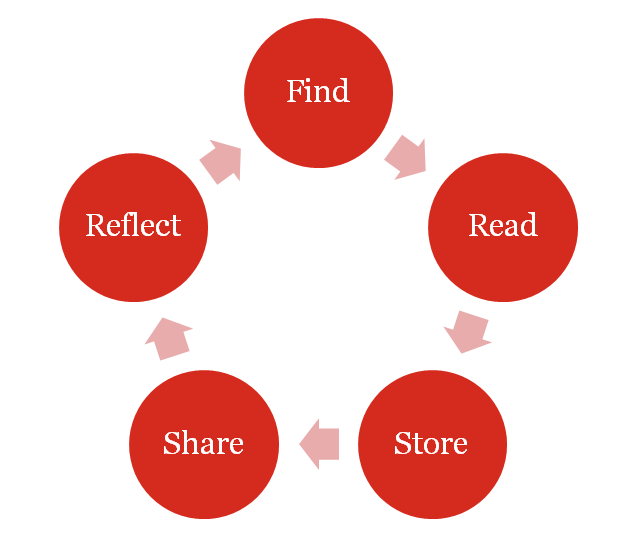
Here’s a simple illustration of a possible workflow routine.

So let’s have a look at the first couple of steps in the process, and consider some of the useful tools that can play a part. Each of the tools we recommend have web and mobile versions, are available for free and also integrate well with each other.

Find

The first step in the process is Find, and we’ll assume that you are already doing that in a variety of ways. Information could be coming to you via:

  • your own web searches and general browsing
  • blogs you follow (you might read these in a service like Feedly)
  • social networking sites like Facebook, Twitter, YouTube & Pinterest
  • social bookmarking and curation sites like Scoop.It, Diigo or Pearl Trees
  • emails from colleagues and face to face meetings

Whatever the information you find, you’ll already be assessing the content for value and making some decisions. A quick scan of a site or article will help you to decide what to do in the next step of your workflow.

Read

Now that you’ve found an interesting resource you’ll need to make a decision about what you want to do next. This could depend on how much time you have, whether you’re on a mobile device (those videos can chew up your data allowance pretty quickly) and whether you’re in the mood to read an article or watch a video. So we need to do a form of triage and decide what we want to read now and what we might want to read a bit later.

The best tool we’ve found for doing this is Pocket. It’s a free service with web and mobile app versions and allows you to save articles and videos for later viewing. Articles are presented in a lovely, clean reading view, and the mobile apps also download all of the content to your device so you can read even when you don’t have an internet connection. Pocket comes with extensions that can be installed in your web browser for one click saving of pages, and it also integrates really well with many of the popular services like Twitter and Feedly.

Here’s how to get started with Pocket.

  • Visit getpocket.com and sign up for an account
  • Install the Pocket extension in your browser. The How to Save page will give you a link to install the correct extension (for Firefox, Chrome or Safari) or a bookmark button for Internet Explorer. Once installed, look for the Pocket icon in your browser’s toolbar. Then you can save any page for later reading.
  • Link your email account to your Pocket account so you add resources via email.  Here’s a guide to the process.
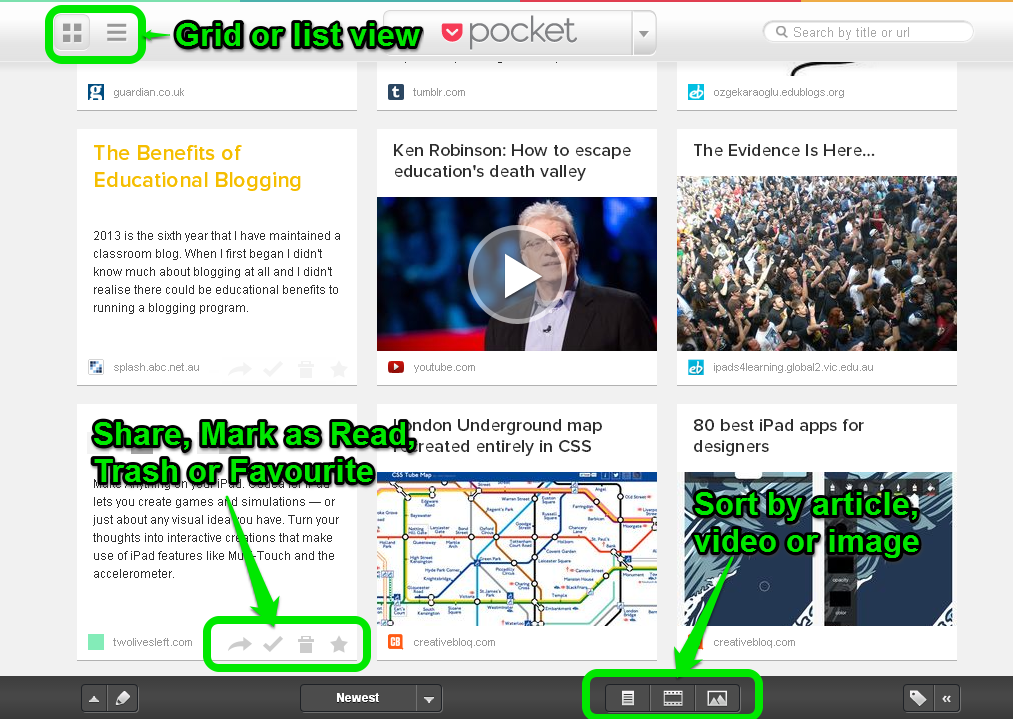
  • You can see your saved articles in your web browser by visiting your queue. The queue can be organised as a grid or list view, can be searched and can also be sorted by article, video or image.


  • Download the Pocket app for your mobile device to read articles on the move. There is also an app for Apple Macs. Search your relevant app store for the Pocket app. Pocket’s mobile app will download your content so you can view it even when you don’t have an internet connection (perfect for the train).
  • Keep an eye out for the Pocket icon appearing in other services like Twitter or Feedly to make saving easier. We even include a Pocket icon at the bottom of each Bright Ideas post so you can save it for later. If you have Pocket installed in Chrome and login to Twitter then you’ll see the saving option appear under tweets with links (look for the more icon if you can’t see it). The best bit is that on mobile devices and the Mac app Pocket will also show you the original tweet, so you know where you discovered it. Genius.
    One click saving from Twitter makes it easy to save the tweet and the link

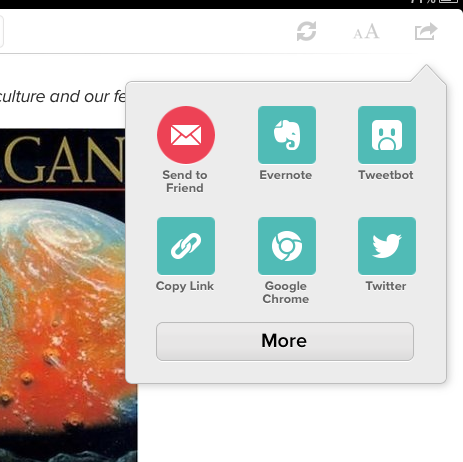
The Pocket mobile app has a number of sharing options, making it a pivotal tool in your mobile workflow.

Once you have viewed the item in Pocket, your next decision will be what to do with it. You can choose to mark the item as read, which will keep it in your Pocket archive. Selecting Trash will remove the item completely from your library.

You will also need to decide whether the resource should be moved into the next two areas of your workflow, store and share, which we will explore next. Fortunately Pocket includes a number of options for sending the article to other services like Twitter and Facebook. The Pocket mobile app also has even more options for sending to services like Evernote, Diigo, Delicious or Tumblr. Look for the arrow icon and join up the services you use.

Pocket can play a valuable part in your workflow as a holding pen for interesting resources. It integrates well with a wide variety of other services, making saving to Pocket and then storing or sharing a simple process.


Image credit: State Library of Victoria, photographer (1954), Basement of Dome building showing deteriorating stacks of newspapers and books, State Library of Victoria

 

Talking about content curation

Rhondda Powling was part of  a group, including staff from the State Library of Victoria, who presented at SLAV ‘s ‘Be in control: participate in the new age of school libraries’ on the value of personal learning networks, workflows and online tools. This guest post reflects on her presentation exploring content curation. You can find Rhondda’s blog here.

I was asked to speak about ‘Content Curation’ at a recent SLAV conference. You could say a lot about curation but I was asked to do two short sessions about ten minutes long. What to include in this brief session and what to leave out was a conundrum. I wanted the topic of curation to make sense. I tried to focus my thoughts on what I believe curation means to me. Why is it important to my learning, how do I use it with colleagues and students and why should I? So this is my experience of curation.

The phrases ‘content curation’ and ‘digital curation’ are buzz words in the online world, especially in my library networks. Although curation tools are many and varied, the approach I take when running sessions for teachers at my school is that when used properly, these tools enhance professional learning.

The AITSL Professional Standards for Teachers includes a section on Professional Engagement. The first paragraph under this is ‘Teachers model effective learning’. They identify their own learning needs and analyse, evaluate and expand their professional learning, both with colleagues and individually. One of the ways to demonstrate this kind of learning is through professional reading. It is easy to keep a record of professional reading and evidence of learning and sharing if you become a good content curator. Content curation also covers the collegial aspect.

Content or digital curation is not simply collecting links. Many teacher librarians, myself included, have been collecting links (for example: school topics, research) for years. So:

  • it’s not really a creating process as such but rather a process of sorting, arranging and then further publishing about information that already exists in the online or digital world
  • it is a process of first finding digital content that might be useful then sorting the results into the best and most relevant links, value adding with annotations and then sharing them in meaningful (organized) ways.

Good curators identify and define their topics or subjects at the outset. They then select what to keep whilst providing some context and annotation. Good curators make sure they correctly credit the sources as they offer their networks appropriate and easy access to their curated sources.

How to begin curating

Focused filtering and selection is a very important aspect of effective curation. Try to be as clear as possible about what you want. There are many ways to locate good content especially if you use social media. There are also many tools for curating. See my Google doc for some suggestions These are tools I use or others that I have seen. Some I do not use myself but they are recommended by other colleagues. Another post about curation tools that is worth looking at is 55 Content Curation Tools To Discover & Share Digital Content, which includes an annotated list, from the TeachThought blog.

Robin Good is an expert when it comes to the topic of content curation. He has extensive knowledge of the practices and tools and his comprehensive map of content curation tools and skills is divided into key categories. There are over 250 tools in this collection, so be prepared and take it slowly.

I have found that the best way to choose a curation tool is to be as clear as possible about what you want then spend some time looking for the tool/s that best suit your needs. That means, as you begin, have a ‘play’ with different tools and evaluate them critically. Some tools offer more advanced filtering search options than others. Some are more visual. Of course, as with everything in the digital world, things may change and what works for a while may alter its perspective and/or no longer continue to meet your needs.

I use around five main tools that allow me to find information and links. I actively search for information on specific topics and follow a number of people and groups using social media who have similar interests to me. These include my Diigo groups, Scoop.it and Paper.li authors via gmail notifications and summaries. I usually get daily, but sometimes weekly, summaries sent to me.

I do not regard Twitter as a curation tool but I find it very useful (via groups and hashtags) to locate possibly useful content. If I don’t have time to read it fully, I use Diigo’s “read later” option to help me filter out what I want to annotate and keep. Twitter is also one of the ways I inform others in my networks about possible sources that may also be of interest to them. Pinterest and Scoop.it are both curation tools that I use often and they make it easy to share to other social media platforms.

When I first began I looked at what others were doing. Here are a selection of people I follow:

 by cambodia4kidsorg

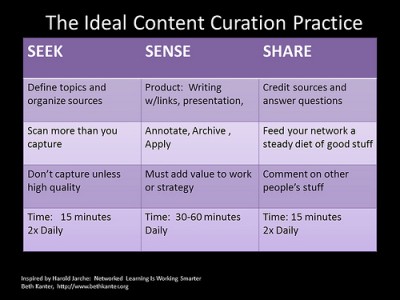
I think it is important that the task of curating becomes a regular one, part of the daily routine. Beth’s suggestion about timing is a good one. I try to go through my lists most days. If, after a week I haven’t got to suggested sites, I usually delete the suggested lists, as new ones keep coming in.

My time was up. This was as far I got with my coverage of the topic. There is more I could discuss especially how it might be used to assist student learning.

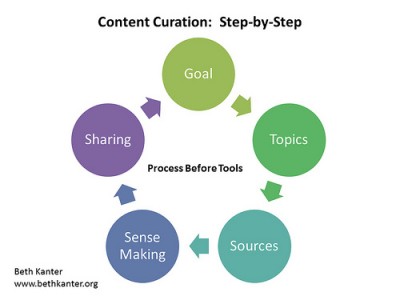
I left the group with a second graphic that offers a good visual about the process of curating.

 by cambodia4kidsorg

And these videos about why it’s important to curate.


Image credit: Alfred E. McMicken, (1936) Greenville Public Library, [mobile library service] [picture], State Library of Victoria Pictures Collection.
 

Be in control: participate in the new age of school libraries

On May 24th, SLAV hosted ‘Be in control: participate in the new age of school libraries’, a conference for library teams. In this post Cindy Tschernitz, SLAV Executive Officer, reflects on the day. The Bright Ideas team also interviewed delegates at the conference and you can listen to the recording here.

What a fantastic day for all delegates. We embraced the year’s theme of ‘Participate, engage, shine – you, me, us’ with a great level of engagement, interaction and enthusiasm. Delegates don’t want to be passive receptors of information and we need to engage, challenge and involve which we did at this conference. It was particularly heartening to see and hear from library team members who learnt from each other and spread the word beyond Melbourne Park through Twitter.

You can see a Camilla Elliott’s Storify of tweets from the day here.

Speakers were outstanding. James Laussen Principal of Overnewton Anglican Community College and Joy Whiteside, Head of Library (a very active SLAV member and John Ward Award winner) did an excellent job setting the scene for the day. Jim gave us an overview of where education is going and Joy followed with her well researched paper on where school libraries are going. She told it as it is, no holds barred and really allowed all to reflect on their role in the school library and greater school community. We had a solid basis for the rest of the day.

Michael Jongen discussed the issues around how we can best provide access to all types of digital content. What struck me was the complexity of improving access and the more Michael spoke, the more issues were raised. As many of the delegates were involved in technical aspects of school libraries, like cataloguing, there were many many questions raised. To some degree it appears that the new cataloguing rules, RDA (Resource Description and Access) will need ongoing revision and adaptation to keep pace with digital content.

From the feedback we received, the concurrent sessions were very engaging. Thank you to Joyce, Michael and Renate and the one I attended, Management 101 presented by Janet Blackwell. Janet spoke with experience, wisdom and honesty. Telling it like it is should have been the theme for the day. Janet led us through her toolbox, showed us the tactics that she has used to ensure that the school library she is responsible for gets the credit and dollars that it  deserves by making it an indispensable part of the school community. Jane gave us some fantastic quotes which I would encourage all to look at via the days Twitter hashtag #SLAVconf.

The partnership between SLAV and the State Library of Victoria was highlighted by the afternoon’s session led by Kelly Gardiner and Cameron Hocking. The panel discussion of PLN participants and stakeholders gave some insight into the value of the PLN. It was great for those of us who are PLN dropouts to know we’re not alone and even more importantly that there are ways we can improve our time management strategies to help complete the course next time. The hands-on demonstrations exploring search strategies, curation, social media and workflow were also excellent. Next conference we will make sure that we have more time so people can attend more than one practical session.

To finish the day and highlight the importance of SLAV’s partnerships with both ALIA and other state school library associations in the Australian arena, Sue McKerracher spoke about a number of initiatives particularly the The Future of the Profession project and the 13 Project. These projects bring together government, school library associations and other agencies in an initiative that will support the school community but will also provide an important platform for advocacy for school libraries.

If I had only one word to describe the conference it would be ‘invigorating’. I am looking forward to the next one on August 15 Transliteracy: who do you ask and how can you participate? which features Professor Kristin Fontichiaro, University of Michigan, School of Information in her first Australian visit. Hope to see you there.

Online assemblies using Blackboard Collaborate

Scott Duncan from Cranbourne East Primary School recently spoke at TeachMeet Melbourne at the State Library of Victoria. His school has begun using Blackboard Collaborate to run online assemblies. This post, which originally appeared on his blog, details the process.

Cranbourne East Primary School shares a site and facilities with the local secondary college. Given the size of our school population and available facilities, we found we didn’t have a large enough space to accommodate a whole school assembly. We looked into alternative methods of delivery and began broadcasting assemblies using web conferencing.

We run sessions using Blackboard Collaborate, previously known as Elluminate, and publish them through our school website. Parents and members of the community who subscribe to our school website receive an e-mail notification when the session becomes available.

Every seven days (our school works on a 7 day rotating timetable cycle) I create a session and post the link on the school website. I also develop and upload PowerPoint slides and a recording of the National Anthem.

Our principal and school captains host the assembly and co-moderate the session. We meet about 15 minutes prior to the session and run through the agenda and slides.

Our online assemblies generally include:

  • A technical run through (audio setup, using the mic etc…) and reminders about acceptable use of Blackboard Collaborate for new users and parents at home
  • Welcome to country led by our school captains
  • The National Anthem – words appear on slides and we use the multimedia function to send out the music
  • Sign of the week – AUSLAN is our LOTE and each week our AUSLAN teacher uses the video tool to demonstrate a new sign for the week
  • Principal’s report – we cross to the Principals office where our principal uses slides, video and/or audio tools to present his report
  • Student performances are broadcast using audio and video tools
  • Shining Star Awards – the award co-ordinator creates slides which I include in the overall presentation, school captains read out winners’ names (we only publish first names due to cybersafety and privacy) and students collect their awards from the office at the end of the day
  • Mathletics update – the numeracy co-ordinator uses audio tools to present an update on students’ mathletics achievements
  • House Points – our house captains read out weekly results and scores appear on slides
  • Any other teacher announcements – staff use the ‘raise hand’ tool to indicate they have something to share and use the microphone tool to talk
  • Assembly recordings are published to our school website for those who miss the ‘live’ session.

Since we began using web conferencing, staff are considering ways to they can use the software with students. Parents who can’t come to assemblies can now participate from home, watch recordings and see students’ awards and presentations . The online assembly program has also helped students develop speaking and listening skills.

I hope to expand the program and involve more students, train more teachers as moderators and investigate ways we can involve people from the broader community.

You can see Scott’s presentation at TeachMeet Melbourne here.

Image credit: T.P. Bennett, (1915) Assembly in hall [picture], State Library of Victoria Pictures Collection

Foldify

When it comes to apps and tools we tend to focus on free services, because, let’s face it, the price is right. It’s not often that we review and recommend a paid app, but when it comes to Foldify I’m going to make an exception, because it does something that is quite innovative. This is an app that  makes the most of your tablet and bridges the gap between the digital and physical.

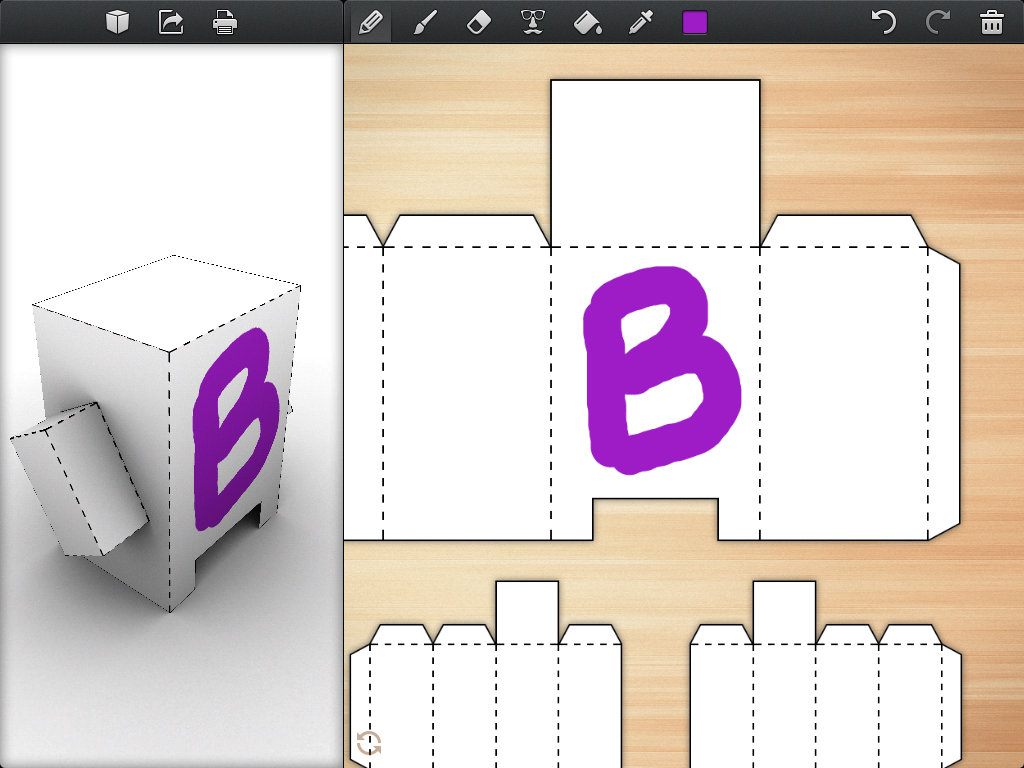
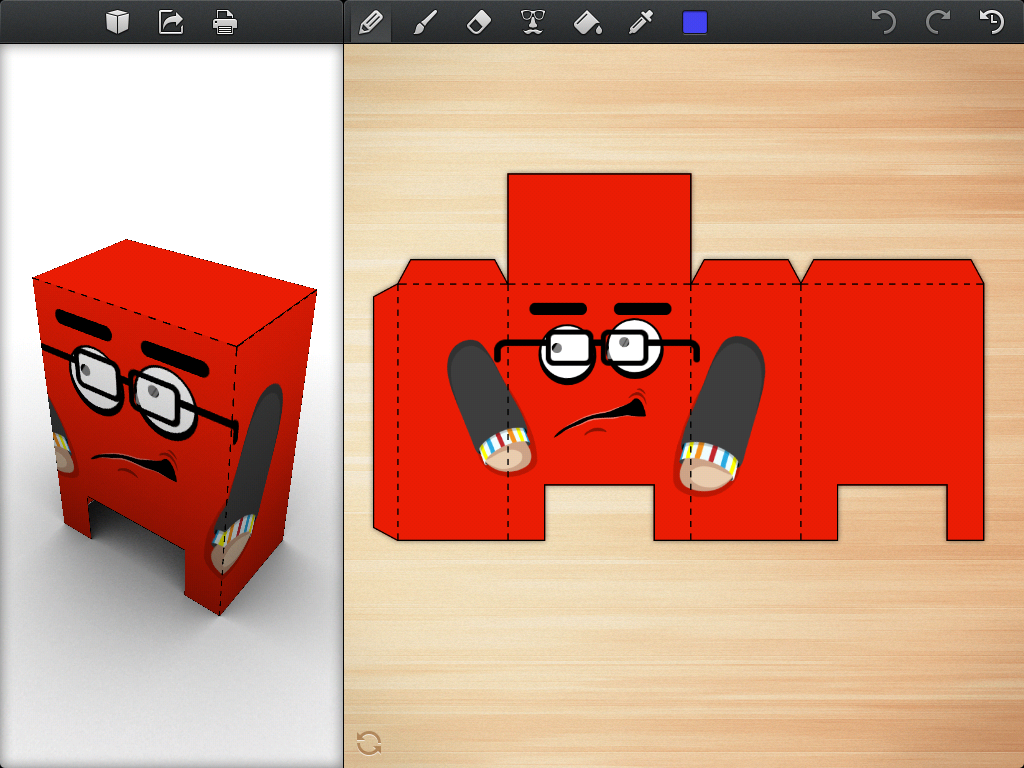
Foldify runs on iPad and includes a number of different templates for making papercraft shapes (those little characters made by folding paper). Each blank template is presented as a flat two dimensional view and can be decorated with shapes, stamps, patterns and fills. The controls are similar to standard painting programs.

Foldify editor

Foldify includes a range of painting options and stamps


Where Foldify really shines is that any changes made to the two dimensional shape are also reflected in real time on the three dimensional model. For people who are spatially challenged (like me) it’s a great way of seeing how the 2D template translates into a 3D shape.


Foldify- Little Red Man

Changes made to the 2D template (on the right of screen) are instantly updated on the 3D preview.

Design and painting of shapes can be a bit fiddly and tricky, but some great results can be achieved even for those with limited artistic talent. There’s a range of stamps that can be added like body parts, natural objects and patterns. You can even import photographs to add to your shapes. Once your object is completed you can output to a PDF, print via Airprint or even upload for sharing on the Foldify website.

Once you’ve printed the object on some firm card then the real fun begins. Break out the glue, sticky tape and scissors, cut around the shape, fold along the dotted lines and assemble your creation. If you’d like to have a go for yourself then you can download our Little Red Man creation (PDF).

Foldify is available from the Itunes store for $2.99. You can find out more about the app and see a demonstration video on the developer’s website. It’s also worth having a look at this stop motion video produced using Foldify characters, created by 14 year old Yash Banka.

Terms of Service; Didn’t Read

The most time-consuming part of evaluating web tools for educational use has got to be looking at the Terms of Service (also know as Terms of Use or Terms and Conditions). They can go on for pages, and are so often wrapped up in so much legalese that even if you manage to read to the end, there is no guarantee you will be any wiser. And yet we can’t just ignore them; it is our duty as educators and as digital citizens to protect rights and understand responsibilities online.

Wouldn’t it be great if  Google Translate could do something to convert ToS into Plain English? Well, Terms of Service; Didn’t Read might be just the web project we’ve been waiting for. ToS:DR (for short) are a user rights group aiming to rate and label website terms & privacy policies from “very good Class A to very bad Class E.”  As well as rating them, they are also providing a “thumbs up/thumbs down” report card that helps users better understand individual aspects of a service agreement. The report card is written in bullet point fashion but it is possible to expand the points for more detailed explanations, access the full terms of the web tool and there are discussion pages available behind each of the points.

ToS;DR is still very new (started in mid-2012) so the number of sites that have report cards are limited, but it is an excellent example of the positive change that can occur through global connectivity and collaboration, and the project is actively growing.

This is a grassroots project, created by citizens and volunteers who take their responsibilities very seriously; they engage in a peer-reviewed process of rating and analysing to create each rating, and they are committed to Creative Commons and Free Software licensing.

While this site does not take the place of legal advice, it does help users make some sense of the pages and pages of fine print before we click, and ultimately that offers us the chance to make better online choices.

Untangling the Web with Aleks Krotoski

Aleks Krotoski is an academic,  psychologist and journalist who writes about the impact of technology on our lives. Aleks’ upcoming book Untangling the Web: What the Internet is Doing to You, explores the ways the web can influence our relationships and change our perceptions of ourselves and others.

Aleks is in Australia as the inaugural speaker for the Digital Society series at the State Library of Victoria (tickets are still available for both free events on May 20 & May 21). We were lucky enough to speak to Aleks about her work. You can listen to the full interview below, as Aleks explores the importance of cultivating an online persona,  the tension that exists between our private and public selves and the importance of information literacy. She also shares her ambition to own a full set of the 1974 Encyclopaedia Britannica.


Portrait of ASeks Krotoski © Kevin MeredithShow notes and links:

Aleks’ online reporter’s notebook for Untangling the Web

Aleks Krotoski on Twitter

Aleks’ Tech Weekly podcast series

Aleks interviews T. Mills Kelly on Lying about the past

Delete: The Virtue of Forgetting in the Digital Age by Viktor Mayer-Schönberger (Amazon)

Google’s Eric Schmidt: The Internet needs a delete button  


Clip web pages to Evernote with Dolphin Browser for iPad

We’ve made no secret of our love for Evernote here at Bright Ideas, as it’s one of the best ways to keep notes and bookmarks together. One great feature of Evernote is the Web Clipper which works in most major web browsers and makes it easy to save articles for later reading. But on the iPad it’s a bit of a different story, as the iPad’s built in Safari browser doesn’t integrate very well with the Evernote web clipper.

We’ve written about a rather complicated solution to this problem in the past, but this tends to be a bit unreliable. A much more sturdy solution has now come along in the form of the free Dolphin Browser for iPad. Dolphin integrates with Evernote to make saving web pages to your account easy.

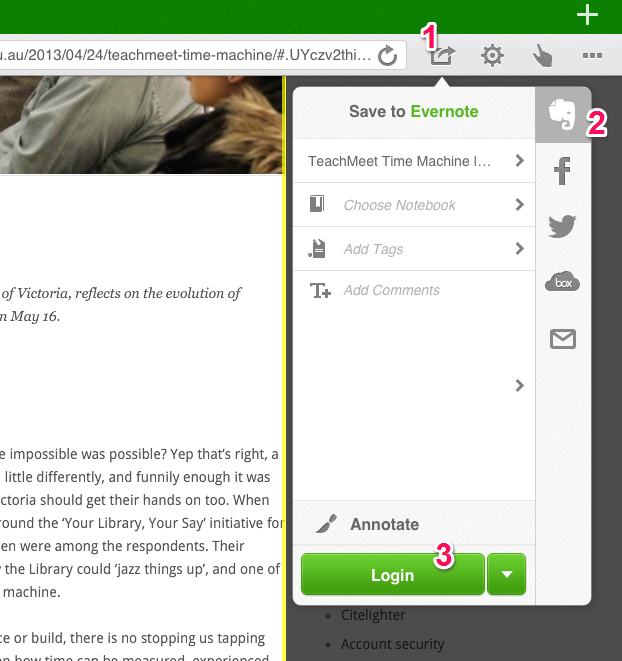
To set up Evernote integration, first install and open the Dolphin Browser for iPad app. When you find a page you’d like to save follow these steps:

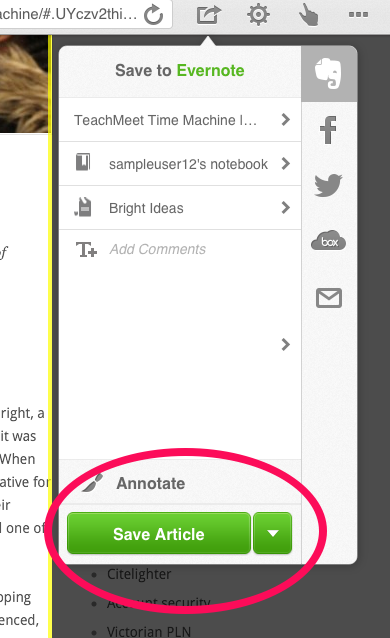
  1. Select the sharing button (a small rectangle with an arrow)
  2. Select the Evernote elephant logo.
  3. Choose Login (you should only have to do this once).
Once you’d entered your Evernote login details you will see the Save Article option (circled below). The small drop down menu next to this button lets you choose to save the entire web page instead. You can also add tags, choose the notebook to store the note in and add comments. When you are happy select the Save button. The page or article should now be saved in your Evernote account for posterity.

Dolphin browser also has some interesting features apart from Evernote integration, including the option to draw commands on your screen (for example you could draw a G to take you to Google). It’s well worth a look as a good alternative to Safari.

The one draw back is that unfortunately Apple still don’t let users choose their default web browser (unless you want to jailbreak your device) so you’ll have to remember to open Dolphin for your browsing sessions instead of Safari. Hopefully with the upcoming IOS operating system upgrade this option will finally be available to users of Apple devices. But if you are a regular user of Evernote and you own an iPad then it is definitely worth remembering to use Dolphin browser to make saving those articles easier.


Bamboo Dirt: I need a digital research tool to …

Whenever we are faced with learning new skills or new methods we tend to focus on the tools. However, when we shift our focus from  the tools to what can be done with them, real transformation occurs. Mastery and success become possible; it’s the same whether you are learning to paint with oils or teach research skills at a 1:1 netbook/iPad/BYOD school.

Bamboo Dirt is an online registry created to help educators make that shift. Its focus is on research tools and the Bamboo Dirt search function is organised around the idea of purpose.

Bamboo Dirt’s home page offers lots of browsing categories based around tasks. Categories include:

  • visualise data
  • organise research materials
  • manage tasks
  • manage bibliographic information
  • communicate with colleagues
  • author an interactive work
  •  build and share collections

Users can also search or browse by keyword, tags, recommended resources, and new resources. Each result has a short description plus information on cost, licensing and platforms.

You can make the site even better by joining and contributing. Registration is free and members can:
  • add resources
  • review them
  • comment/describe how you have used a tool
  • recommend good resources and those appropriate for beginners
  • submit tips and tricks to help others understand the value of the tool
This service is an ongoing collaborative effort between Bamboo Partner Institutions (UC Berkeley, UChicago, UW Madison), Bamboo affiliates (University of Alabama, NINES), and individuals dedicated to helping connect people with digital resources. It’s a welcome addition to any educator’s  research toolkit.


VicPLN list of online tools

As part of Unit 4 – Teaching and learning tools in the Victorian Personal Learning Network (PLN), our team has collated a list of online tools for participants to test drive and review.

The list has been collated  in a Google doc – Tools.

Tools are tagged using the following categories (with a few examples):

If you’re more of a visual type, we have also built a list in a Springpad notebook. You can sort by tags using the Filter option (this may not display properly in some browsers, so if it doesn’t just use the Google Document instead).

We will be posting regularly to #vicpln with links to people’s reviews and examples.

Image credit: Helmut Newton, (1953) Construction of 36-mile oil pipeline at Corio, State Library of Victoria Pictures Collection